Last Updated on March 18, 2024 by Masha Eretnova
I’ve found that there is no full answer to many beginners who struggle with the isolation coat. What is it anyway and why do we even need one?
In fact, it’s a process that can easily be your good painting practice if you’re aiming to enjoy your painting for many years, and can save you from some future mistakes.
The isolation coat for acrylic painting is optional but highly recommended to protect the finished painting before varnishing and to make it last longer.
In fact, there are 3 reasons why an isolation coat is important, especially for acrylic painting. It is a key article before you varnish and finish any of your paintings!
You will learn the side effects of not using an isolation coat, the 6 best products, and some tips from an experienced artist.
Table of Contents
What is an Isolation coat?
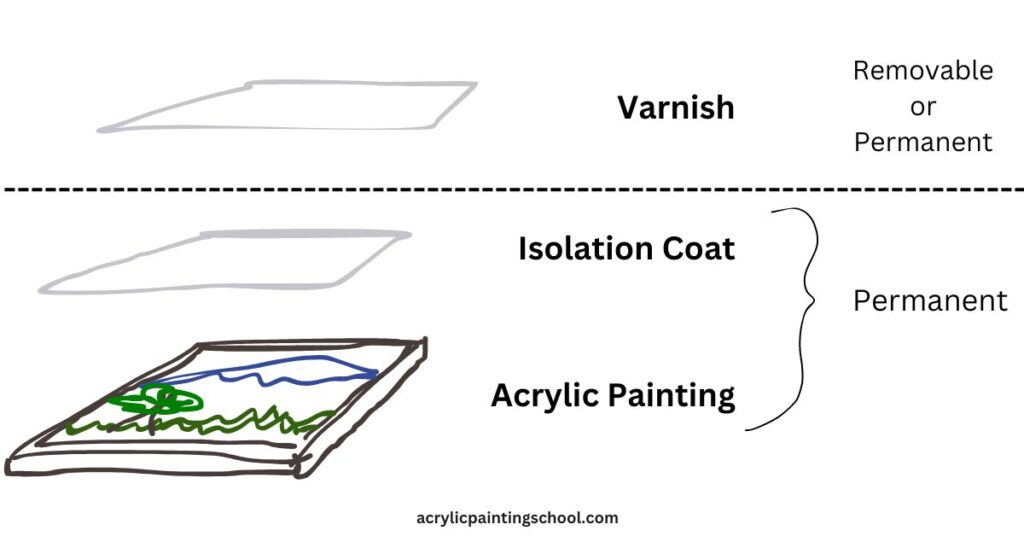
An isolation coat is a transparent protective coat you apply onto your finished and dried acrylic painting before varnishing it to physically separate the painting and the varnish.
An isolation coat protects the acrylic painting from interacting with varnish. It also allows you to remove a varnish (if you do so) while your painting will remain intact.
All isolation coats are permanent and cannot be removed so the application needs to careful.
Unlike acrylic paintings, oil paintings do not need an isolation coat because oil varnish removals can only remove the varnish and cannot damage the paint. So we don’t have to add an extra layer.
Why isolation coat is necessary?
My experience and research show that the isolation coat is vital for acrylic painting for 3 reasons:
- The isolation coat is applied before varnishing to protect your painting. First of all, an isolation coat will create a sealed surface.
- Colored wash or stains can contain fewer pigments in the binder, which means these areas of your painting will be extremely fragile and it could also lead to paint lifting. To avoid it, an isolation coat is necessary.
- Isolation coat levels the surface of acrylic painting to make the varnish stick better, more even, and smother.
- But more importantly, an isolation coat will protect your acrylic painting if you remove the varnish. Without any isolation, your paint pigments will be also removed and you will see abrasion, and chemicals contained in varnish removals can damage the painting.
But why exactly do you need to remove varnish?
Well, if you want your painting to last longer, it is recommended to remove and replace the varnish every 5-10 years (depending on the state and environment).
To remove an acrylic varnish you will use a solution that contains ammonia. Ammonia removes not only the varnish but any water-based mediums, including paint.
So without an isolation coat, you make your painting last only 5 years because you won’t be able to redo the varnish if it starts to yellow.
Another reason why you may need to remove varnish (which means you absolutely need an isolation coat) is when you apply varnish onto a finished painting and when it’s drying you realize that it became cloudy, sag, or even produced some bubbles. In this case, you will remove it and replace it immediately.
But be very aware that some of the varnish products are non-removable!
It means that if it yellows you won’t be able to remove it and even if you attempt to do so, without an isolation coat – you will destroy the painting too!
Once you have applied an isolation coat, you are safe and you can re-varnish the cloudy area or just replace the varnish every 5-10 years. Basically, an isolation coat makes sure nothing that happens after can touch the painting.
Insider tip: removing varnish is not an enjoyable process. Make sure you made some tests before applying it to your painting and you didn’t forget about the isolation coat.
After all, a painting with an isolation coat and varnishing will always look more professional, be more enjoyable to admire due to the even surface, and cost more.
What can I use for an isolation coat for acrylic painting?
There are gloss, matte, and satin mediums or special Isolation coat mediums you can use:
- Gloss mediums are the most crystal clear, and the least disruptive to the appearance of colors. Gloss mediums are most recommended.
- Matte mediums will dull the vibrancy of colors and successive layers of matte medium will begin to look milky or foggy (This can create a moody, encaustic-like effect which can be great if you were expecting it, or potentially devastating if you were not.)

- Isolation Coat is a permanent, ready-to-use sealing coat that is applied between acrylic color and removable varnish
- It is important to use gloss products when applying the isolation coat as satin or matte products can reduce the clarity of the piece and potentially leave a cloudy or dusty look
- SEALS any absorbent areas in order to create an even surface on which to apply the varnish
- PROTECTS the painting if or when the varnish is removed by separating the pigmented area of the painting from the solvents used in the removal
- Made in the USA with globally sourced materials by an employee-owned company with more than 40 years of experience making paint for professional artists
If you don’t want your painting to be glossy, you can apply matte or satin varnish onto your glossy isolation coat. It will help you still have a very clear look but without inappropriate gloss.
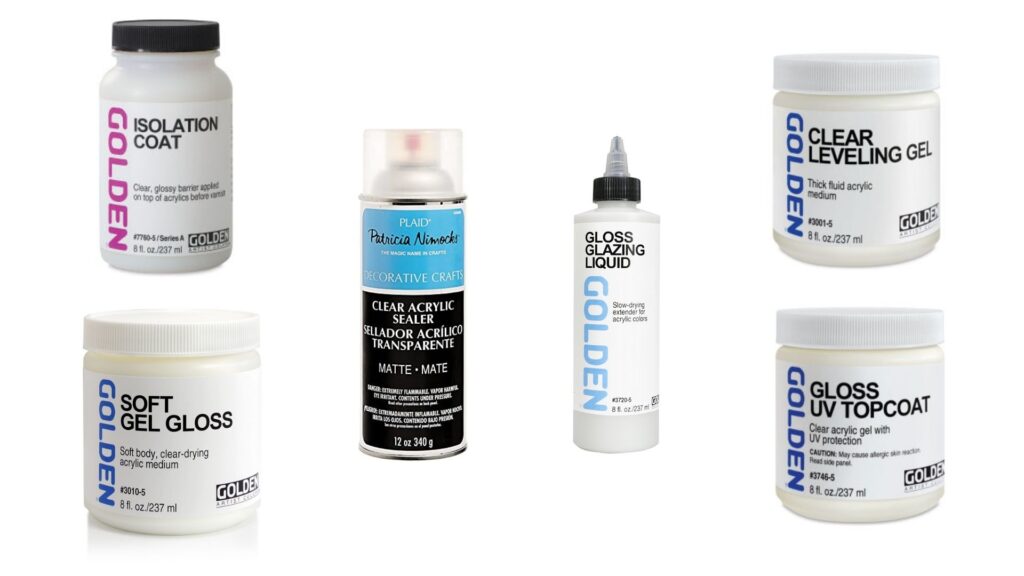
Here are 6 affordable and recommended products you can use as isolation coats:
| Brand Name | Price | Notes |
| Golden Isolation Coat – BEST | $14.41-$31.39 | Softer than regular gel, won’t hold a sharp texture but still shows brush strokes. Thinner than a regular polymer medium. Glossy |
| Golden Soft Gel Gloss | $13.70-$78.68 | Clear drying. Glossy. Very popular among painters. |
| Delta Creative Clear Acrylic Sealers | $8.29-$14.30 | This is a spray: matte and gloss. Protect from yellowing. But could be an eye irritant. |
| Golden Acrylic Glazing Liquid Gloss | $10.97-$21.95 | Has a longer working time than typical acrylic mediums. Dries slowly. More for fine art and creating glazes or faux finishes. |
| Golden Clear Leveling Gel | $10.19-$65.87 | Good for textured paintings. Create a smooth surface with no brush strokes |
| Golden Gloss UV Topcoat | $25.91-$34 | Good for textured paintings. A regular gel with added UV protects paintings from fading |
Applying Isolation Coat: Rules
Before we move on to the step-by-step process, remember these 8 rules about applying isolation coat:
- You apply an isolation coat consciously, quickly, and carefully
- Your painting is fully dried (at least 24h) before isolation coat application
- There are NO brush hairs on the surface before the isolation coat application
- You’ve signed your painting before the isolation coat application
- You apply the isolation coat in a dry, dust-free room and you use a clean brush. No pets in the room.
- Apply only 1 coat of your isolation medium and wait 24-72 hours before varnishing.
- Take photos of your painting before the isolation coat
- Avoid thick layers of isolation coat by any means!
Now we are ready to proceed. The way you apply the isolation coat is fully dependent on the texture of the painting.
How to apply the isolation coat for acrylic painting
Step 1 – Prepare the isolation coat medium
Prepare the isolation coat medium if you’re using soft gel gloss, the pre-mixed isolation coat is ready to apply.
Matte medium works too but it can slightly dull the colors. To balance it out use gloss or high-gloss varnish.
- Mix 2 parts soft gel gloss to 1 part distilled water. The mix should be thick and white.
- If you don’t want to mix – use ready-to-use Isolation Coating.
These are recommendations for Golden gel gloss, but you should follow the instructions on the gloss medium or gel gloss that you’ve chosen.
Little by little add some water to mix it better, but do not add too much! The consistency should be thick.
Step 2 – Application of the isolation coat
Using a wide clean brush (the one you know will leave no strokes or hairs) apply the isolation coat on your painting side to side, but never go over just painted and semi-dried areas!
Work quickly and make a thin layer, half mm.
After you are done, with an almost dry brush (clean the excess of the isolation coat mix) go over the painting to make sure there are no lifted areas.
Tilt the painting. Look at the reflection at an angle to see if you have missed any spots.
Let it dry for 24-72 hours before varnishing.
Done:) Your painting is safe!
6 more tips for applying an isolation coat
A textured acrylic painting: it is recommended to use a spray to prevent foam formation. If you’re still using a brush, apply about 1.5-2.5mm of the isolation coat, do not use a fluid medium because it can create bubbles if brushed.
If you have colored wash or stains: it is recommended to use a spray to prevent fuzzy paints.
You were waiting more than 2 weeks before varnishing: wipe your painting with a soft lint-free cloth before applying varnish.
The optimal thickness of the isolation coat for smooth paintings: is 0.5-1.5mm.
If you want a very even surface with no brush strokes: after applying the isolation, use a foam rubber brayer to roll over the wet coat and smooth the surface.
If you are coating the sides of the canvas: place something under each corner of the painting, this way it will not stick to the surface below.
Here is also a product information sheet about isolation coats by Golden.
Can I skip Isolation Coat?
Although a standard technical way to finish an acrylic painting is to use an isolation coat before varnishing it, modern artists often skip isolation coats.
- Firstly because today’s varnishes have become better. They are less yellowing and damage the painting less.
- Second, painters just don’t bother planning 50 years ahead for the time they may (or may not) need to remove the varnish and redo it. Many painters, myself included, directly varnish acrylic paintings with liquid or spray varnishes and we have no issues.
- Third, if you have a non-removable varnish, there is no point using an isolation coat – you are not going to redo the varnish and apply anything over, anyway. You only need to apply an isolation coat if you’re using a removable varnish, which you should.
- There are also solvent-based varnishes that you can use for acrylic painting, for ex., Royal Talens Amsterdam Acrylic Satin Varnish.
For us it means that when you will remove this varnish, you will something that “attacks” only solvents, not acrylic paint. And technically you can skip the isolation coat.
I would personally still do it, because solvent-based varnish removals are very strong and it is unpredictable if they will lift acrylic paint or not.
FAQ
Can you paint over an isolation coat?
I’ve never done that and will avoid doing it, but I know that some artists leave paintings with only isolation coats to repaint them later.
It won’t be easy because an isolation coat is not a perfect surface to paint on, but still possible. It will be even less easy to remove the paint you apply over the isolation coat.
Can an isolation coat be left without varnish on an acrylic painting?
You can do it, but I do not recommend it. The varnishing protects the acrylic paintings from yellowing, UV, and dust, but an isolation coat for acrylic painting doesn’t have protective properties against environmental factors.
Done with isolation coat? Then you’re ready to varnish your masterpiece! Please, follow my very simple process of varnishing an acrylic painting: How to varnish an acrylic painting
Do you have any questions about isolation coats?

Masha Eretnova, born in 1991, is a Chiang Mai-based certified teacher, artist, and blogger with 20+ years of personal painting journey.
She started painting and drawing very early and is now an international abstract artist and educator passionate about acrylic painting, gouache, and crafts.
Her works are part of international exhibitions and contests, including ArtlyMix (Brazil), Al-Tiba 9 (Spain), Exhibizone (Canada), Italy, and many more.
Besides her artistic pursuits, Masha holds a post-grad diploma in Teaching Film Photography and 2 music school diplomas: piano and opera singing.
Last update on 2026-07-23 / Affiliate links / Images from Amazon Product Advertising API