Last Updated on November 19, 2023 by Masha Eretnova
When I started acrylic painting the first issue I had was one of my acrylic paintings cracking! Losing the paintings I’ve done with a lot of love (and time) would be discouraging.
And in this article, I’ll show you how to fix cracked acrylic paintings quickly and easily! I’ll also show you how to save a canvas for repainting if you feel your cracked acrylic painting is beyond repair.
Can you fix cracks? You can definitely fix cracked acrylic painting! But how exactly can we fix cracking acrylic paintings? The most popular way to fix cracking, which I personally recommend, is a simple fill in option. Based on many artists’ experiences, these are the 3 best ways to fix an acrylic painting:
- Scraping or sanding off + repainting
- Filling
- Just letting the painting be
The best method for you depends on your needs and what caused cracking. I’ll explain how to fix your painting using each method step by step. Also, I will share how to avoid cracking in your future paintings based on which medium you use.
Related: How to Fix Lumpy & Chunky Acrylic Paint? [10 Easy Methods]
Table of Contents
What is cracking and What is the difference between cracking and crazing?
Cracking – A line, a break on the surface of something along which it has split without breaking into separate parts.
Crazing – A crack in a surface or coating (as of glaze or enamel) or a network of fine cracks
As you can see, there is no dramatic difference between cracking and crazing. Feel free to use both terms and consider glazing more in the context of acrylic pouring and pottery.
Priming is also important for some surfaces like wood or canvas and can help prevent paint soaking and eventually cracking.
Read also: Why Is Your Acrylic Paint Sticky? 10 Easy Ways To Fix Sticky Paint
How to fix a cracked acrylic painting?
As we already know there are 3 ways to fix our cracked paintings:
Each method has some nuances and the best method for your painting sometimes depends on what caused the cracking. There are many reasons why acrylic paintings crack. Though the methods of scraping, repainting, and filling are appropriate for most causes of cracking it is important to understand the reasons for the cracking.
This helps us not only choose the best method for repair and to avoid cracking in the future. We will cover the reasons for cracking in paintings, the best method for repairing them, and how to prevent them in the future.
Read more: What is Acrylic Paint? Ultimate Acrylics 101
1 – Scraping or sanding off and repainting
Scraping, sanding off and repainting sounds a bit dramatic, I agree, but sometimes, if you really want to keep this painting (or just the canvas) you should consider sanding off (or scraping) the bits of the painting that are cracking.
If your painting has smaller, cracking spots that you would like to repair, sanding is the best option for you.
If you prefer to remove all of the crack acrylic paint from the canvas in order to save and repaint the entire canvas, scraping is the best option for you.
After sanding or scraping, we then repaint and varnish our painting.
These approaches are good ideas for both beginners and pros and here is why:
- If you are a beginner it’s a great way to learn the art of painting and all the skills involved. Practice makes perfect.
- For Pros, it also works because through hours of experience they know exactly how to redo paintings even better.
- Sanding is also used not only to take off layers but also to create textures and cool effects!
Be aware that sanding is not the same as just filling in a crack! If you want to add a new coat of paint or repaint or if you see big cracks or bubbles and bumps then please be aware you will need to follow this guide first:
Step-by-step Sanding off and repainting guide:
If you wish to repair small, cracking spots on your acrylic painting, the sanding technique is a great option.
Time: up to 3 hours (depending on the size)
- Prepare your painting and place it under light to see all cracks clearly.
- Get sandpaper. If you choose to sand the cracked area, use fine-grit sandpaper to as not to ruin your beautiful masterpiece! 220 grit sandpaper is a great choice.
- To avoid waves or rippling on the canvas, place a piece of cardboard behind, and support the back of the canvas with your hand while sanding.
- Use sandpaper over the cracks with circular motions. Depending on how big your painting is and how many cracks you have, this step could take up to 1 hour. The result of this step – is a smooth surface with no trace of cracks.
- Now you’re ready to repaint the sanded area. Choose the color wisely, if you already know that the paint you used the first time was too transparent or patchy or caused cracks, don’t use it again. If possible, try the chosen color on a small piece of your painting before actually repainting the whole sanded area.
- Repaint the sanded area using your favorite brush with 1 or 2 coats.
- Let the painting dry for 24 to 72 hours, with 72 hours being the maximum dry time before applying varnish (in step 8) to avoid excess dust collecting on the painting.
- Use 2-3 coats of varnish
- It’s done! Congrats 🙂
Step-by-step Scraping guide:
Scraping is another great option. Whereas sanding and repainting allow us to fix a single cracked spot to restore a painting, in the scraping technique we remove all of the paint and preserve the canvas for use in another painting later.
Scraping is the best technique for use on a cracked acrylic painting if you decide to save only the canvas and redo the painting from scratch. Here is how we will go through the technique of scraping acrylic paint to fix the cracking:
Tip: Better do it over the sink if you have a small painting.
- Wrap your painting in durable paper towels that won’t dissolve quickly in water. Make sure you have enough paper towels to cover each side of the painting.
- Place the painting into the sink and give it a good spray with water. This will cause the paper towel to stick to the painting. The paper towel will hold moisture in the painting and not in the wooden canvas support. Leave the wrapped painting for 20-30 minutes and give it another good spray. Repeat this process until the painting is sufficiently soaked. This step will probably take several hours in total.
- Take off the towels and get a knife ready to scrape. A pocket knife would be fine.
- With an angle of 90 degrees start scraping the painting. Don’t press too hard to avoid damaging the canvas. The paint should easily scrape away. If not, return to step 2.
- Take a regular dish scrub sponge and scrape the rest of the small pieces of cracked paint from the canvas.
- Let the canvas dry overnight and it would be ready to paint again!
Here is a video of how to scrape the acrylic painting:
There are actually a few methods to remove acrylic paint from other surfaces and get rid of the paint smell. I share them in separate posts:
- How To Remove Acrylic Paint Easily? Full Guide (Skin, Fabric, Floor, Wood, etc)
- 15 Ways How to Get Rid of Paint Smell Safe and Fast
- 23 Ways How to Get Spray Paint off Skin Safely With Household Products
2 – Letting it be
All art pieces are beautiful! It could be even beneficial if you do some kind of marble, old-style or abstract acrylic painting or pouring. You can always pretend as if you made it on purpose.
Did you know? Crackle painting – is a painting technique aiming to give a painted surface a crackle and aged look.
On SaatchiArt there are some Crackle Paintings For Sale, one of the most expensive is for 12,300$.
Also remember that many famous paintings in art museums around the world have cracks, which only improve their look.
If the “letting it be” option frustrates you, try to ask your friends about your painting without them knowing if it has any cracks or not. You will get an honest opinion from 80% of the people about your painting and most will say it looks just fine. Only you and nosey artists will point cracks.
Also try to find a new place for this painting, with different light and decor around the painting, and come back to look at it once again later. Give yourself some time away from the painting, and a new backdrop may change your opinion of its beauty.
3 – Filling cracks with paint
The easiest way to fix acrylic painting is pouring cracks, which is very good both for beginners and pros and is a very simple fill-in process.
Step-by-step instructions for filling in cracks on acrylic paintings:
Total Time: 45 minutes
Prepare the surface
Make sure the surface is clean and you have enough light. The room temperature should be 65-75F or 18-24C for best results.
Choose the color
Prepare the basic color (i.e., white or whichever color you feel will look best). Use liquid acrylic paint.
If you know exactly which paint you used previously for this specific area, perfect! Grab it and move to step 3. If no, you have 2 options:
– find a good color for the area using a color chart or just your feeling
– mix your available paint colors to get the right one, or as close as possible
Fill in the cracks
Rub the paint inside each crack with fingers or a cloth. Fingers are best as it’s much easier because you will immediately feel where to add more paint or if the paint should be thinner.
Depending on the size of the cracks you can also use a paintbrush, a spoon, a child’s plastic medication syringe, or a zip log back with a small corner cut out to insert paint directly into the crack.
Be sure to add slightly more than the crack will take as the paint will shrink as it dries.
Cleaning
Once you have finished rubbing or filling the crack, clean the excess paint with a cloth while trying to rub the paint in even more.
Dry and repeat
Once the paint has dried, check to see if the fill was sufficient. If you feel it wasn’t enough you can repeat step 3.
Be aware that if the crack is deep it will be hard to erase all traces of the crack, but the filling will dramatically improve the aesthetics of the painting.
When do cracking and crazing happen?
Crazes and cracks form during the initial drying process when the top coat of paint dries faster than the underlying layer.
During the dying process, more cracks can appear. The painting can eventually continue to crack until it is completely dried.
How to fix a cracked acrylic pouring?
Fixing cracks in acrylic pouring can be trickier than fixing a crack in a painting.
Why?
Sometimes pours are much thicker, so the cracks are deeper. The color patterns and lines are also often unpredictable, even though the colors during pouring do not mix with each other completely, sometimes layers and cells create visual effects that will be hard to reproduce.
The most common reasons for pouring to crack are over-thinned paint, too much paint poured on the canvas, and improper drying conditions.
Easy fixes:
- sand the area and paint over
- fill in the crack with the matching color or gold, or silver colors to make accents
- gluing glass beads, shells, and rocks to create texture and hide cracks
- just painting over
- scraping the whole thing/sanding and repour it completely.
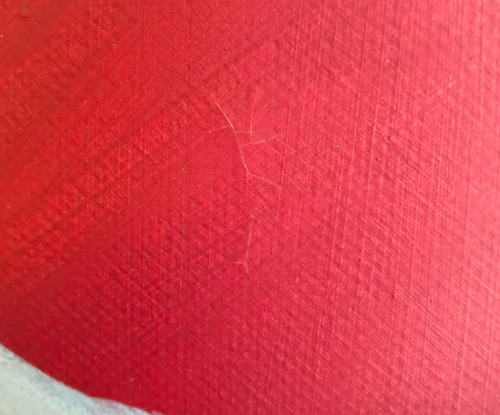
And sometimes there is just a tiny invisible crack, but sometimes the whole canvas is like a desert with no rain…It happened to me as well. I had a small pouring that cracked like this (pretty bad, huh):
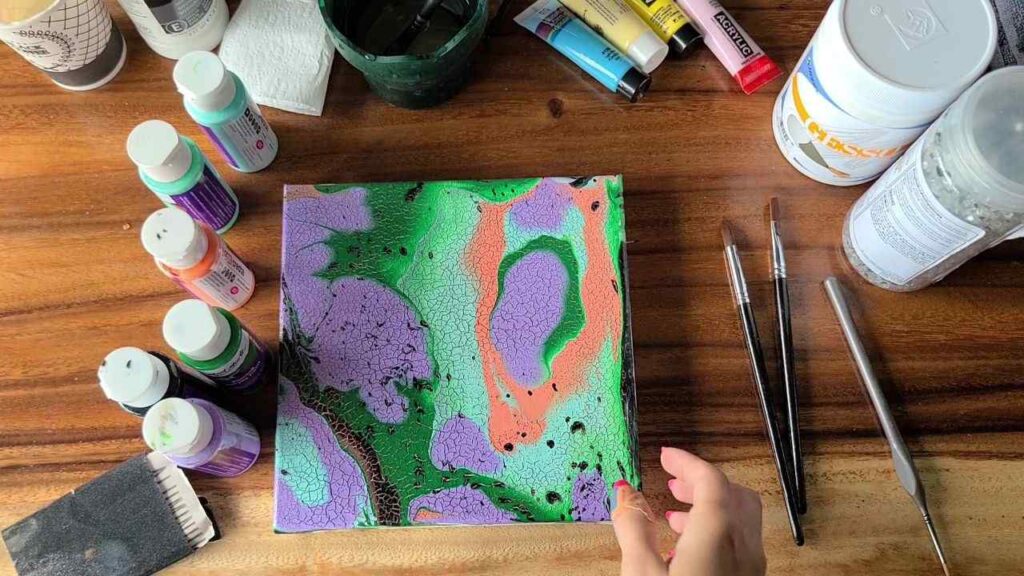
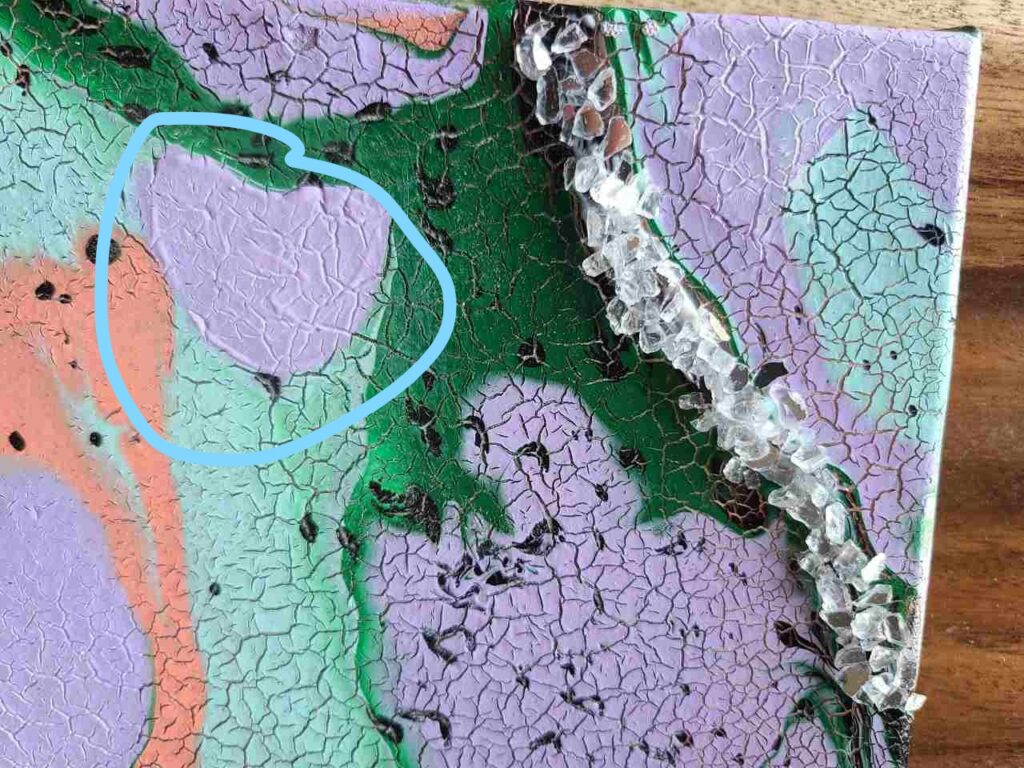
And unfortunately, all the cracks were pretty deep. I tried sanding, filing in the cracks, and adding glass beads. Gluing beads worked amazingly:
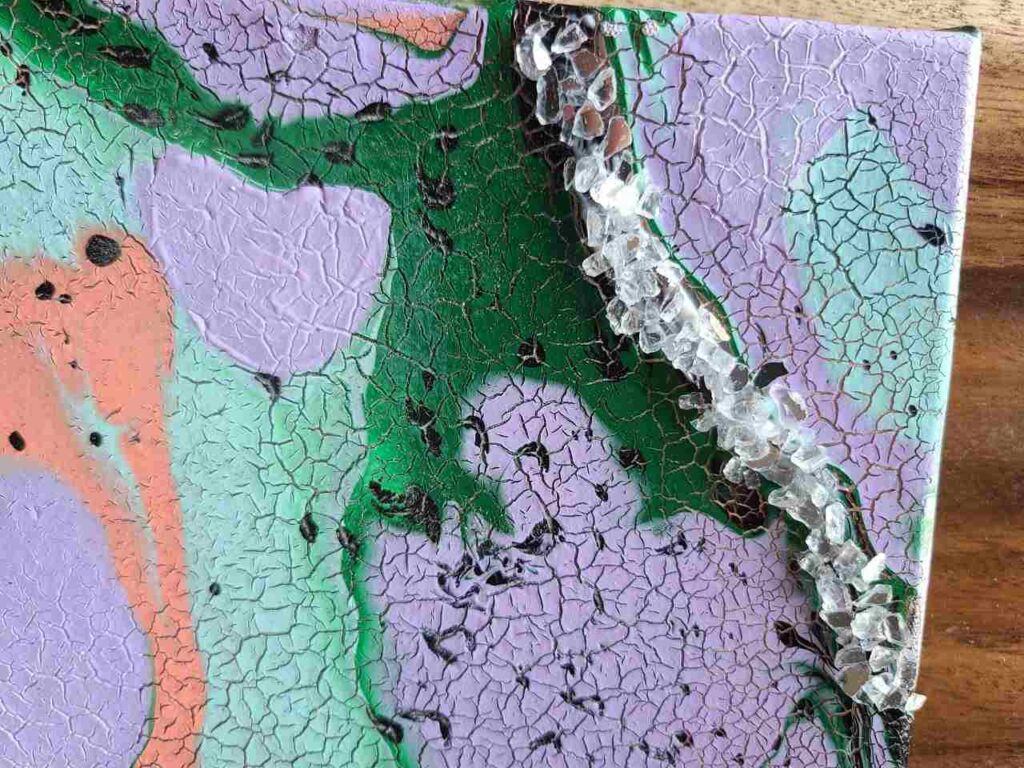
But I cannot glue it over the whole painting, so I still needed a solution. Sanding didn’t help as cracks were too deep, so I tried filling them with matching colors:
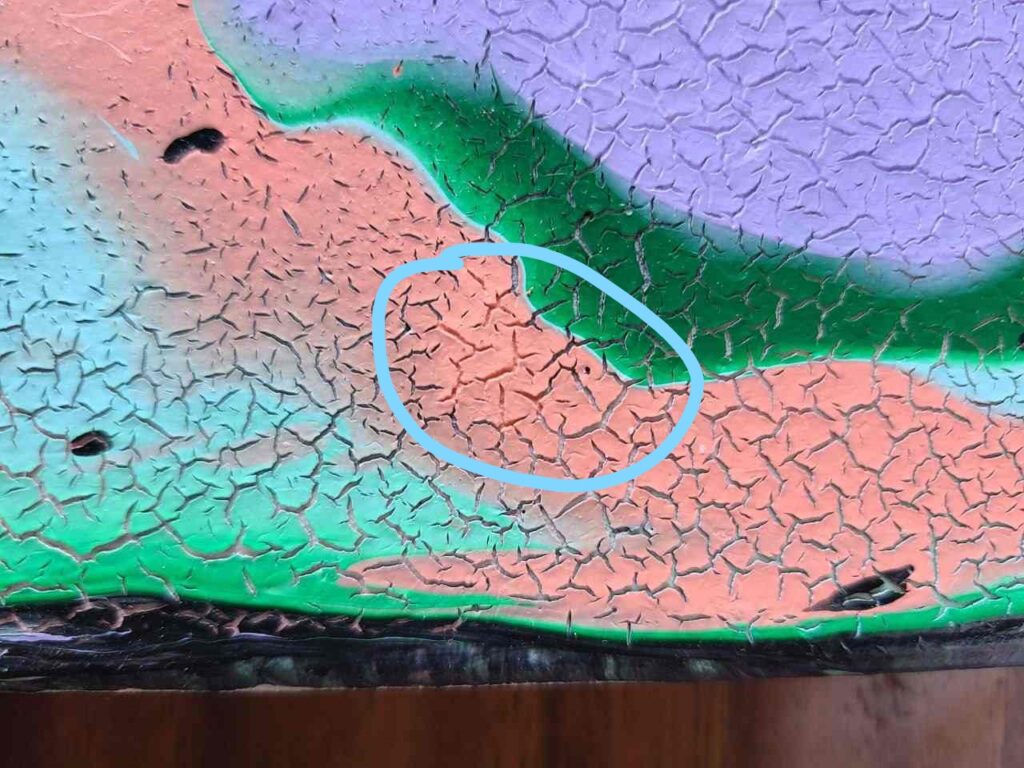
It didn’t really help, the cracks were still visible. If I paint over – same case, from a distance you may think it is fine but when you come closer you see all the cracks:
I even tried to sand an area, fill the cracks with gesso, and then paint over – still the same outcome. So I ended up just repouring completely. Sometimes, we cannot fix the painting and the sooner we let it go, the sooner we will make space for new artwork.
The new pouring turned out like this:

6 Reasons why acrylic paintings crack
The reasons why your acrylic paintings are cracking are not numerous and are all very understandable and easy to prevent.
Cracking happens to acrylic pouring but could occur to acrylic painting too. The main reason why cracking occurs is we put too much love paint on the canvas and do so too quickly, altering the drying process. It’s important to note that often cracking is caused by multiple factors at once.
The 6 typical causes for cracking:
- Bad quality acrylic paint
- Canvas stretching
- Paint layer is too thick
- Paint layer is too thin
- Inappropriate environment for the painting process and storing
- Bad painting process timing
Let’s get into an in-depth study of acrylic cracking causes.
Bad quality paint
I’d like to underline here that the factor is the quality, not the price. It’s correct that sometimes we are more likely to think cracking occurs because of cheap materials. It could absolutely be the case, but don’t blame your paints straight away, especially if you know that the paints worked before.
There are still many forum users who count on cheap paint and have great results.
Related post: 21 Best Acrylic Paint Brands for Beginners and Professional Artists
Think also about how you store your paints. If you do fluid art or acrylic pouring you might mix your paints first and then store them in bottles. Sometimes the paints aren’t blended well enough and develop clumps in the mixing process that affect the paint quality.
These clumps can degrade the quality of the paint, ultimately leading to cracking later. To avoid this, store only clean, well-mixed paint by pouring your mixed paints into bottles using a fine strainer to catch all bumps and clumps.
This way, we store and use only good quality, well-mixed paint, helping us avoid cracks later.
Too much paint or too thick layers
The more paint you put on a canvas, the higher chances are of cracking. This is especially true if you have other factors increasing these changes, such as poor-quality paint.
The paint is too thin
Thin paint is a common problem when blending acrylic paints with water or solvents for acrylic pouring techniques. Acrylic paints are water-based by themselves.
When there is too much water in the mix (60% or more), it will alter the pigment density of the paint to the state of wash. The water changes the consistency of the paint always by making it thinner. Most importantly, thinning paint with water decreases the adhesion of the paint to the painting surface.
Related post: How to Thin Acrylic Paint
How much water can I add to acrylic paints? You can add up to 30% water to acrylic paint to make the coat rich and glossy, up to 60% to make it watery like watercolor.
What kind of water should I use? Make sure you use distilled water for pouring, not tap water.
What ratio and recipe are good for acrylic pouring?
- For fluid acrylics: 2:1 Paint to Pouring Medium;
- For craft acrylics: 1:1 Paint to Pouring Medium;
- For medium body acrylics: 1:3 Paint to Pouring Medium;
- For heavy body acrylics: 1:6 Paint to Pouring Medium.
Bad canvas
The most common issue regarding canvas problems is that the canvas is not stretched properly, which contributes to cracks during the drying process.
Related post: Best Canvas for Acrylic Painting for Beginners that Professionals use
How to fix badly stretched canvas before painting
If you are about to paint and notice that your canvas is saggy, try to fix the canvas before painting. This method takes a decent amount of time and sometimes it’s worth just using a new and properly stretched canvas.
What you will need:
- Measurement tape
- A piece of chipboard or similar solid material bigger than your canvas. Not pieces!
- Spray bottle
- Knife
- Hairdryer
- Wood keys for canvas (you can buy these here**)
- Hammer
A step-by-step guide to fixing a loose canvas:
- Measure the frame of the canvas from the inside.
- Cut chipboard (or another material you’ve found) at least 1/2″ bigger than the measurement of the sides and 1″ smaller than the measurement of the top and bottom.
- Fit the board between the frame and the canvas.
- Fill the spray bottle with water and spray the back of your canvas in between the frame and canvas. Make sure you don’t soak the canvas!
- Dry it with a hairdryer.
- In the canvas frame, you will see in the corners special holes for wood keys to tighten the canvas. You need to purchase them separately.
- Tap 2 keys into each corner with a hammer. Be gentle!
- When you are done, remove the board.
Environment
There are 4 environmental factors to consider while doing acrylic painting or pouring: temperature, humidity, airflow, and elevation. Make a note – anything that causes a difference in drying times between layers of paint increases the chance of cracking.
Temperature: It is best to keep your paintings in rooms where the temperature is between 65-75 degrees Fahrenheit. When the temperatures are over 75 degrees Fahrenheit (over 24C) the layers of paint will dry at a different speed (causing crazing) and temperatures under 65 degrees Fahrenheit (under 18C) don’t let the acrylic paint dry, or make the drying process slow and even lead to freezing as acrylic paints are made of water and water-based solvents. This will also cause cracking and other undesirable effects.
What temperature is good to store acrylic paintings? 65-75 degrees Fahrenheit (18 – 24 C).
The temperature is important throughout all paintings’ lifetimes. If this painting has been kept in an environment where there is a lot of humidity in the warm months and then dry heated air in the cold weather months, it can cause some pretty extreme expansion and shrinkage of the canvas support. The temperature changes stress the painted surface and may result in cracks.
Humidity: When the humidity is too high (over 50%) your paintings will not dry because the water molecules in the paint can’t evaporate. Low humidity (under 40%) makes the paint dry too fast which provokes crazing because the water molecules in the paint evaporate at a much faster rate.
What level of humidity is good to store acrylic paintings? The best humidity to store artwork is 40-50%.
Airflow: This factor is generally combined with the humidity factor. If you have a fan blowing on your drying painting in a low-humidity climate then chances are that the top layer will dry faster and cause cracking.
Can you use a fan to dry acrylic paintings? You can use a fan to help your paintings dry without causing crazing only in a high-humidity room.
Note that the amount of air in the room has more influence on the top layer drying time and less on the bottom one, so again it increases cracking risks.
Elevation: High elevations will help your painting to dry quicker because of the higher air pressure. Air pressure helps molecules move faster. Lower elevation areas will slow the drying of your painting.
Bad timing
Bad timing can cause cracks and crazing in acrylic paintings due to 2 factors
- Not enough cure time between layers, especially thick layers, because the layers dry at different rates.
- Not enough time for the drying process before varnishing or transporting
How long does it take for acrylic paintings to dry?
Thin layers will dry in 20 to 30 minutes and thicker layers can take an 1-2 hours to dry.
For acrylic pour paintings leave for 24 – 72 hours to dry and between 7-14 days to cure.
Related post: How Long Does Acrylic Paint Take to Dry?
How to prevent acrylic painting or pouring from cracking
So now we know exactly what happened and we spent 30 min or a couple of hours fixing the cracked acrylic painting. Considering how much time we spend creating and how demotivating cracks and crazing can be, its worthwhile to try and avoid happening again.
The following pieces of advice will help you enjoy your creative process even more (by better preserving your beautiful artwork). Plus I added a full summary table at the end of the article to briefly review everything we talked about.
Try this to prevent cracking in acrylic paintings:
- Ensure your pour paint mixture is good enough quality. Mixing paints with floetrol and/or glue keeps paint drying smoothly. Try this: 3 parts floetrol + 2 parts glue + 1 parts paint.
- Make sure your paint is not too thick and not too thin.
- Add a good retarder to slow the drying process.
- Adjust environmental variables: right temperature, humidity, air at the workplace, and storeroom.
- Use good quality acrylic paints and canvases
- Size the back of the canvas before painting to protect it. One of the recommended recipes for sealing agents to the back of the canvas is 3 coats of 50/50 mix of acrylic medium mixed with water, make sure you let each coat dry for at least 24h.
- Take notes of what you use on each piece because when you’re experimenting it can be easy to forget exactly what was used!
- Varnish your painting only after it completely dries.
Summary How To Fix Cracked Acrylic Painting:
| The reason “Why” | Impact | How to fix cracks | How to prevent cracking |
| Bad quality paints | 2/5 | Sanding and repainting with good quality paints | – Buy only recommended paints and don’t use expired ones. – Take notes while experimenting or working on materials. – Test paint again on a small piece or change the paints |
| Too thick | 4/5 | Sanding and repainting or filling in | Follow the most adequate for your mixing recipe. |
| Too thin | 3/5 | Sanding and repainting | Follow the most adequate for your mixing recipe. |
| Environment | 4/5 | Fix the cracks one of 2 ways or let them be and make sure your storage room meets all requirements | Keep your workspace between 65-75 degrees Fahrenheit (18-24C) with 40-50% humidity and no fans. |
| Canvas | 1/5 | If you notice it before painting, you can fix the canvas itself. If it comes up during drying or lifetime, try to fix the canvas with cardboard or try to fix the painting itself. | – Size canvas before painting – Buy only recommended and properly stretched canvas. – Take notes while experimenting or working on materials. |
| Time | 4/5 | Sanding and repainting or filling in | – For acrylic pour paintings leave it for 24 – 72 hours to dry and between 7-14 days to cure. – Add a retarder to slow the drying process. |
Another helpful video about fixing acrylic pour paintings:
Fixing cracks FAQ
How to stop acrylic paint from cracking on fabric or denim? Mix your color with the professional Fabric Medium to enhance the flexibility of the dried paint before painting. Make sure you don’t add too much paint or ANY water! Also, don’t forget to do heat-sitting.
How do I fix a painting with too many layers of acrylic paint? If the painting dried with no cracks, don’t do anything. If you have cracks, the best option is to sand off extra layers. You can also contact a professional restorer to work on it, as they will have the tools and expertise.
How to keep acrylic paint from cracking on plastic? Sometimes the acrylic paint will just peel off the plastic, especially if the plastic surface is smooth. Use a stabilizer to prevent cracking or peeling. You can also use a sealer to make the results more permanent.

Masha Eretnova, born in 1991, is a Chiang Mai-based certified teacher, artist, and blogger with 20+ years of personal painting journey.
She started painting and drawing very early and is now an international abstract artist and educator passionate about acrylic painting, gouache, and crafts.
Her works are part of international exhibitions and contests, including ArtlyMix (Brazil), Al-Tiba 9 (Spain), Exhibizone (Canada), Italy, and many more.
Besides her artistic pursuits, Masha holds a post-grad diploma in Teaching Film Photography and 2 music school diplomas: piano and opera singing.