Last Updated on March 19, 2024 by Masha Eretnova
Lumpy acrylic paint has its days. You shake and stir and shake some more, but most of it still stays lumpy.
Is it old paint or cheap craft paint? Did I mix it well? Maybe the paint container isn’t sealed airtight? Found lumps in your fresh acrylic pouring?
Don’t panic. You don’t have to throw it away just yet! I’ll show you how to fix lumpy paint using several proven methods and save money in the long run.
You can fix lumpy acrylic paint by straining, adding water or cornstarch, or with the help of an acrylic medium.
Extra chunky acrylic paint? Tweezers and 220 fine-grit sandpaper are useful in dealing with those annoying chunks.
Why Does Acrylic Paint Become Chunky or Lumpy?
Old paint, inexpensive paint of low quality, improper mixing, not storing paint in airtight containers, and drastic temperature changes.
These are several reasons why your acrylic paint is chunky or lumpy.
Other reasons you might be hearing for the first time include microbial contamination and a damaged or dirty lid.
Bad Paint
Old and cheap quality paint is by far the most common culprit. But how old is too old? Most acrylic paints have an average shelf life between 2 to 5 years, that is if… it wasn’t stored properly.
Generally, old paint can also mean expired acrylic paint. And if it’s expired, you’re dealing with a case of microbial contamination. Due to the bacteria, you get a lumpy or rubbery consistency.
Pro tip: When buying acrylic paint, don’t grab the ones in the front row. Due to rotating stock, old paint is moved to the front and new paint to the back.
With proper storage, acrylic paint should last you for 10+ years. To make sure it’s still in tip-top shape, smell your acrylic paint.
If you catch a whiff of sourness or it smells “off,” don’t throw it away.
That’s what this guide is for, after all.
I’m a firm believer in transferring even newly bought acrylics to airtight containers. Why? Because in some cases, you might get an acrylic paint tube with a damaged lid and the paint will get too much air exposure.
We all know what happens when you don’t have an airtight seal on your paint tube, right? Put simply, excess moisture comes in contact with your acrylic paint and ruins its quality.
The lesson to be learned?
Always use an airtight container or at least any storage with an airtight seal.
When it comes to cheap quality acrylic paint, lumps tend to form faster.
Worse – it’s harder to fix chunky acrylic paint in cheap quality products. In the later part of this guide, I have just the hack for fixing poor-quality acrylic paint.
Related: Best Acrylic Paint: 21 Brands Reviewed for Beginners [From Cheap to Pro]
Bad mixing
Improper mixing is also another cause for those chunky bits.
If this were peanut butter, sign me up, but acrylic paint can be so demanding at times. But it is easy to learn proper color mixing!
You need to spend at least 5 minutes to properly mix acrylic paint. This especially happens if you’re using white-colored mediums.
Other reasons why your acrylic paint is chunky:
- Using a thick coat. A thin coat of paint helps achieve smooth and lump-free results. If there’s too much paint on your brush, you get the lumpy effect and brush strokes.
- Not cleaning the lid. I’m guilty of this too sometimes. You might have some leftover paint on the lid, and even if it’s only a small amount, this can quickly add up. Over time, this small leftover paint can fill the tube opening. And before you know it, you can’t squeeze the paint out because your acrylics have become chunky.
- Poor setup. One of the acrylic paint’s benefits is its quick drying time. But with strong, cold air or heat, it’s easy for lumps in acrylic to form just as quickly.
- Adding an extra layer too quickly. If you add an extra layer before the first layer fully dries, you get lumpy paint on your canvas.
- Leaving your paint pot open. A common mistake. Storing acrylic paint in loose containers leads to lumps forming and chunky acrylic paint. Always use airtight containers.
- Lumpy medium. If you are doing pouring and mixed your paint with pouring medium or Floetrol, your lumps are most likely from the medium, not the paint. Strain mediumds before mixing them with paints for fluid art.
- You’ve added acrylic paint to epoxy resin without properly mixing it. Then you will clumps.
If there are too many lumps in your painting and it is still wet, you can scrape the paint completely and restart the painting!
Read more on fixing acrylics: How To Fix Cracked Acrylic Painting in 3 Easy Ways
How to Fix it?
If your acrylic paint is lumpy in the tube or jar, strain it, add water or acrylic medium to it before painting. If the acrylic paint feels lumpy on the canvas, use tweezers or sandpaper to smooth all lumps and chunks. If you’re using acrylic medium or Floetrol – strain it to prevent lumps.
Method #1: Using a Palette Knife
The easiest way to fix lumpy acrylic paint is by simply using a palette knife to break the lumps:
- Squeeze your acrylic paint into your palette
- Using your palette knife, try and break the lumps
- Do this for a good 3 to 5 minutes
- Check if there are leftover chunks or lumpy pieces.
If you notice your acrylic paint is still lumpy, don’t worry.
All your hard work wasn’t in vain. Because there’s a quick solution for this.
Or rather, a simple element you just have to add, which brings us to “Method #2.”
Method #2: Fixing Lumpy Acrylic Paint With Water
You’ve probably read that mixing water with acrylic paint removes the lumps or chunkiness.
And sure enough, it does. Not to mention, it makes your acrylic paint thinner.
But there’s a proper way of doing it too:
- Set aside an airtight container for where you’ll transfer your acrylic paint
- Empty your paint tube onto a paper plate or clean palette
- Loosen up your acrylic paint using a palette knife
- Add a few drops of distilled water and mix together until you notice good consistency
- Repeat step #4 until you achieve the consistency you want
- A good rule of thumb is to add 30% water. Adding more than 50% water gives it a watercolor texture
- Transfer your acrylic paint into an airtight container and seal it
Pro tip: If your acrylic paint has a watercolor-like texture, it means you added too much water. Whereas if the paint doesn’t move smoothly on your canvas, you added too little water making it dry and lumpy.
Using water to fix lumpy acrylic paint has always been the traditional approach.
Sometimes though, chunks in your paint are like stubborn fleas that refuse to go away.
Fortunately, you can still use other methods like straining or acrylic mediums to solve your issue, starting with…
Method #3: Straining
Materials you’ll need:
- Airtight container
- Fine mesh strainer
Another way of seeing “old paint” is if you’ve left your acrylic paint to hang and dry for too long. As is the same problem when you don’t store it in airtight containers.
In cases like these, think of it this way:
The water in your acrylic paint evaporated, making it dry, lumpy, and chunky.
As a result, straining your acrylic paint and even adding a little water during the process should remove those clumps.
Here’s how to do it:
- Grab your fine mesh strainer and place it on top of your airtight container
- Gently pour your acrylic paint onto the strainer (Don’t pour everything all at once).
- Repeat until you’ve finished straining all the acrylic paint
- Check the consistency. If you feel it’s too dry, add small drops of water and mix
- Once done, make sure to seal your airtight container
If water doesn’t work, use a paint thinner or surfactant since they’re more effective and reliable in restoring acrylic paint.
Alternatives to Using a Fine Mesh Strainer for Straining Lumpy/Chunky Acrylic Paint
If you don’t have a fine mesh strainer right now, there’s a cheaper alternative.
They call it… the pantyhose method.
Although the method does imply you should use pantyhose, I’ve learned that nylon socks/stockings work just as well. You don’t need the whole sock either. Just enough to cover your airtight container.
Essentially, it follows the exact step-by-step process of straining lumpy acrylic paint.
The only difference is you’re using pantyhose or nylon socks as a substitute for the fine mesh strainer.
Make sure to cover the entire airtight container with the pantyhose or nylon sock. Using a rubber band should keep the pantyhose or nylon sock firmly attached.
Method #4: Adding an Acrylic Medium
Materials you’ll need:
- Palette knife
- Acrylic medium
- Airtight container
- Paper plate or palette
- Water and mesh strainer (optional)
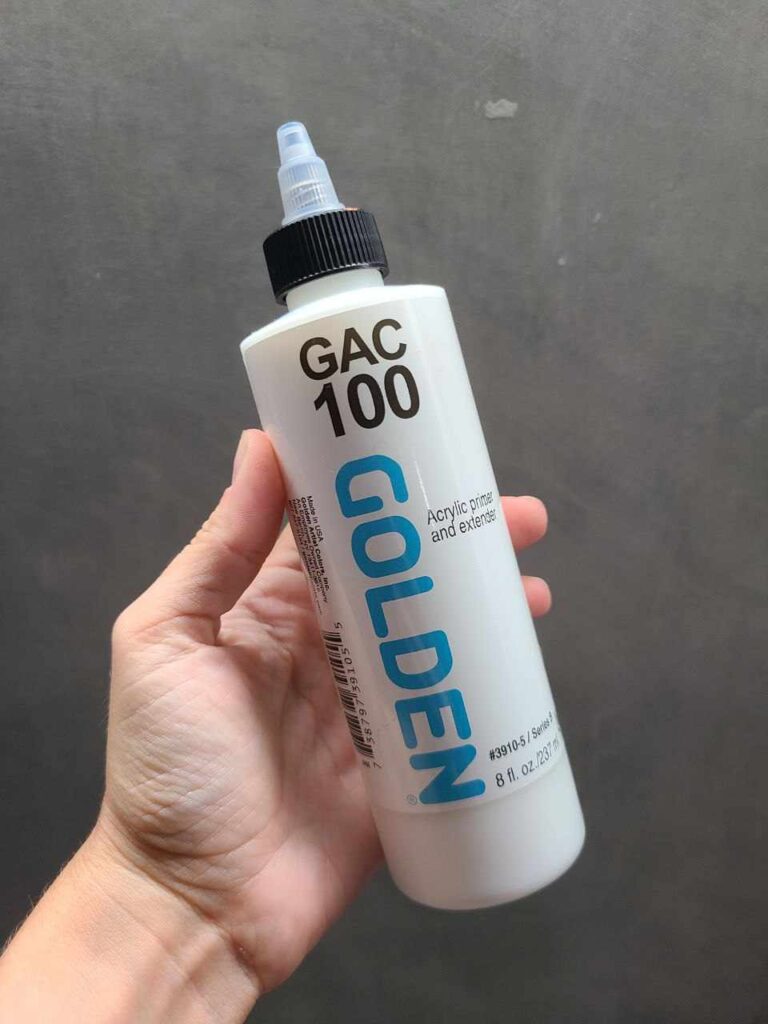
Floetrol, Golden Gloss, and Liquitex are all great acrylic medium brands to go for.
A thinner acrylic medium like Golden Gloss’ GAC 100 or Soft Gel is ideal if you want to loosen lumpy acrylic paint. No matter what medium you choose, proper mixing will be essential.
But if you left your acrylic paint to sit out for too long, you need to add small amounts of water to make up for the water loss.
Other acrylic mediums like Floetrol are a more popular option for painting nad pouring, but can also turn lumpy over time.
That said, you can simply strain your medium using a fine mesh strainer instead of throwing it away.
Now that you know a little about acrylic mediums, here’s how to add it to your lumpy acrylic paint:
- Grab your airtight container and set it aside
- Squeeze all the acrylic paint out of your paint tube onto your paper plate or palette
- Add your acrylic medium
- Using your palette knife, mix your acrylic paint and medium
- Optional: add water to the mix if you feel the paint’s too dry
- Keep mixing until you hit your preferred consistency
- Transfer your acrylic paint to your airtight container then seal
Pro Tip: A good ratio for mixing acrylic mediums with acrylic paint is usually 1:2. So, 1 part acrylic paint and 2 parts acrylic medium. These ratios are also found in the package label.
Should You Strain Your Acrylic Medium?
One of the reasons why some may opt not to use an acrylic medium is because it may get lumpy over time. In the case of Floetrol, this is true. It’s happened to me a few times during my art journey.
Mostly because I left it in storage for too long. If you’re dealing with old paint, any medium or acrylic paint becomes chunky over time too.
So, what’s the fix?
Simple. Strain your acrylic medium.
So you should strain the acrylic medium if:
- You want to guarantee your paint has no lumps or chunkiness
- You’re using old acrylic paint or medium and it’s been sitting out for too long
Straining your acrylic medium takes longer than with lumpy paint alone. So, if you plan to do so, strain them ahead of time.
And of course, don’t forget to shake the medium well.
Method #5: Using Tweezers
Materials you’ll need:
- Tweezers (you can go for the standard or pointed tip)
- Clean miniature paintbrush
If you’ve shaken and stirred but your acrylic paint still looks lumpy on your canvas, you can fix it easily with tweezers.
A steady hand is a key to fixing wet lumpy paint on your canvas.
Press too hard and you’ll smear the colors. Too light and the little bugger will stay a lump for good.
Removing a lump with tweezers is waaaay easier than a strand of hair. Oh the pain!
The beauty of using tweezers is it doesn’t disturb the wet paint on your canvas. But if your hand accidentally slips, that’s where a paintbrush comes in.
Preferably, a coarse paintbrush with synthetic bristles works best.
- Using your tweezers, gently remove the lump
- Use your paintbrush to spread the paint evenly in case of a smear
Alternatively, you can use a coarse paintbrush to remove lumps in your wet canvas. Hold your paintbrush by the ferrule area and gently swipe those lumps away.
Related: 13 Best Brushes for Miniature Painting & Wargames Models [Brushes under $20 included]
Method #6: Sanding
Materials you’ll need:
- Epoxy
- Cardboard
- 220 fine-grit sandpaper
Dried, lumpy acrylic paint is more common in acrylic poured art.
Sandpaper is a game change for pouring artists.
Specifically, 220 fine-grit sandpaper. If you’re using a lower rating like 180, it’s not going to remove the lumps on your canvas effectively.
You also need cardboard for this to work. When you sand the surface of your canvas, this puts pressure which stretches the canvas and eventually ruins your painting.
From there, here’s a step-by-step guide on how it’s done:
- Slide the cardboard into the back of your canvas frame
- Apply light pressure with your hand on the cardboard to act as a support frame when you sand
- Gently sand the lumps and bumps on your canvas in a circular motion
- Keep sanding over the lumps until you notice it’s leveled with your canvas
- Add epoxy to create a smooth finish in your painting
- If it seems impossible to remove all the lumps, add an extra paint coat or use a darker color
For future art projects, I suggest straining your acrylic paint and mediums to prevent any lumps even after your paintings have dried.
This also saves you the hassle of needing to sand your canvas every time you see lumps and bumps in it.
Method #7: Cornstarch
Cornstarch is all you need to fix cheap quality lumpy acrylic paint.
Set aside a small amount of acrylic paint and blend it with cornstarch. You’ll notice that it becomes smoother, despite its old or cheap quality.
I only recommend using cornstarch-blended acrylic paint for practice painting. Instead of using high-quality acrylic paint and spending more every time, you save more with this approach.
Also, in case you just bought acrylic paint a few days ago and you notice it’s lumpy, return it ASAP. Mainly because it means you were sold a bad batch.
Method #8: Fixing Grainy Acrylic Paint
Adding less water, using acrylic mediums or surfactants, adding gesso, or using thicker brushes are several ways to fix grainy acrylic paint.
Grainy acrylic paint happens for several reasons:
- You might have added too much water
- The colors/pigments are naturally grainy
- There’s no sufficient drying time in between each coat
- The air is too humid, which leads to acrylic paint drying even faster than average
Adding water to your acrylic paint isn’t always helpful because not all pigments can be dispersed using water alone.
In cases like these, you need an acrylic medium or a surfactant to separate and stabilize the pigment particles.
They also prevent flocculation.
When pigment particles clump together, this is known as an aggregate. Flocculation is defined as the forming or clumping of particles.
Without a proper surfactant or medium to separate these flocculated pigment particles, you get a fuzzy and grainy look in your painting.
Some pigments are also naturally grainy. Think earth tones like Burnt Umber, Yellow Umber, and Burnt Sienna. The best way to cure these naturally grainy pigments is by adding a medium and squishing both together with your palette knife until you achieve a smooth texture.
You can also use Golden’s Open Gel Medium to slow down the drying time of your acrylic paint and allow more bending time.
If you’re using heavy-body acrylics, stiffer brushes work better. Soft brushes don’t go well with heavy-body acrylics and are frustrating to use both together.
Finally, consider using a wet palette to prevent the acrylic paint from drying too fast while painting.
Overloading your brush with acrylic paint or dipping a dry brush in acrylics may lead to the paint drying on the bristles and never coming out.
Read more: How to Rehydrate Acrylic Paint: 14 Good & Bad Ways To Soften Acrylics
Method #9: Distilled water
The simplest solution is to add distilled water.
A few drops should be fine. Make sure you don’t add 50% water as this might just make it worse. Interestingly though, some even say you should add fine-grit sand or additives like colloidal silica.
Colloidal silica is more commonly used. After adding sand or silica to your acrylic paint, use a putty knife to mix em’ up real good.
If you’re wondering why sand or colloidal silica, here’s why:
Sand thickens the paint. But at the same time, it doesn’t absorb that much moisture the same way plaster does.
Now, what happens if your rubbery acrylic paint becomes grainy even after you added water? Your next best option is to add a surfactant or acrylic medium.
Add a small amount, and use your palette knife to mix your medium/surfactant with the acrylic paint.
Method #10 – Fixing paint clumps in epoxy
If the resin is still wet you may have a chance removing them with a stirring stick but it is dry, there is nothing we can do.
For better results mix acrylic with a little bit of Isopropyl alcohol so they dissolve completely and then add to epoxy.
Then mandatory strain the mix! To get rid of any lumps hiding in the mix.
Tips on How to Make Sure Acrylic Paint Isn’t Lumpy
Painting with acrylics takes practice and most of all, patience.
A common mistake I’ve noticed is being too eager to apply a second or third layer even if the first coat hasn’t properly dried yet.
Sometimes though, using the right tools make all the difference.
That said, here are some useful tips to take with you on your acrylic painting journey to avoid lumps in finished product:
- Invest in higher-quality acrylic paint. Even if it’s slightly pricier than the others. Working with cheap quality paint means a lot of fixing in between work sessions. Liquitex, Golden, Stevenson, and Winsor and Newton are great brands.
- Always wet your brushes. Then blot out any excess water before dipping your brush into acrylic paint. A dry brush dipped in acrylics right away leads to dry bristles/hairs. Once the paint fully dries, it’s a dead brush.
- Use gels, mediums, and surfactants as needed. These are handy if you want to apply a thin layer or coat. Mostly, they reduce the surface tension of your pigments. Reduced surface tension leads to less flocculation, which also results in a lower risk of clumping.
- Strain your acrylic paint and mediums often. Think of straining as a way for your paint and mediums to evolve into their purer form. It’s also a surefire way of preventing lumps and chunky bits.
- Check the label before buying. Go for smooth body or liquid body acrylics instead of gouache or watercolor.
- Store your acrylic paints in the right conditions. Extreme temperatures kill acrylics. Heat causes acrylics to become lumpy or chunky. Whereas exposure to freezing or cold temperatures leads to a grainy effect. Plus, once acrylic paint freezes, you get a tube full of useless paint. And always use airtight containers.
- Don’t buy extra heavy body acrylics. These are way too thick and hard to work with. Get either a soft body or a heavy body. However, with heavy body acrylics, you’ll need to add some water to get a good consistency.
- Avoid natural hair brushes. Acrylic paints destroy natural hair brushes. Without the right brush, how else can you paint properly? Instead, use brushes with synthetic bristles.
- Pay attention to drying times for acrylic paint. Although acrylic paint has quick drying times, you still need to give it the appropriate time to fully dry. Thinner acrylic paints typically take 20 to 30 minutes to dry, while thicker paints take at least an hour or longer. The thicker your coat, the longer you need to wait.
Read also: Simple Acrylic Painting Tips for Beginners & Pros
How to Fix Lumpy Latex Paint?
Materials you’ll need:
- Water
- Stirring stick
- Airtight container
- Fine mesh strainer
Like acrylic paint, lumpy latex paint is also vulnerable to moisture, age, and wrong temperature. If it sits out too long without an airtight seal, it gets lumpy.
If it’s old latex paint, water evaporates making it dry and at times, chunky.
Exposure to heat and the cold also causes latex paint to form lumps and chunks. So, how do you fix lumpy latex paint? Here’s how:
- Use a stirring stick to mix the latex paint and declump it from sitting out too long
- Add room temperature water to thin your latex paint
- If you notice poor consistency and some lumps, grab an airtight container
- Using your fine mesh strainer, pour the latex paint on top of the strainer and onto your airtight container
- Repeat the straining process until you’re satisfied with the results
- Once done, make sure to seal your container tightly
FAQ section
Why Is My Acrylic Paint So Thick?
Acrylic paint becomes thick if it’s been sitting in a container for a long time and doesn’t have an airtight seal. Thick acrylic paint is also a sign that it’s old. Worst case, it might be due to drastic temperature changes like extreme heat or cold.
Lastly, some acrylic paints are naturally thick and are typically regarded as artist-grade. For instance, heavy body and extra heavy body acrylics are naturally thicker than soft body acrylics.
If you’re having difficulty using thick acrylics, try soft body acrylics or add a medium/thinner to reduce the thickness.
how to get lumps out of paint?
The quickest way to get lumps out of paint is by mixing water with it if the paint is still wet or using tweezers if the paint has dried.
A good ratio to follow is 30 ml of water for every 237 ml of paint.
For some acrylics, water may not be enough. This is where adding surfactants and acrylic mediums come in. Golden Gloss and Liquitex are excellent brands to use. If you want an even more effective approach, use a mesh strainer to remove all the lumps and chunks out of acrylic paint.
For dried or cured acrylic paint, you’ll need to use 240-grit sandpaper, followed by priming, and then repainting.
Why Is My Acrylic Paint Not Smooth?
Temperature changes, cheap quality paint, and using the wrong brush are common reasons why your acrylic paint isn’t smooth.
To improve the texture of your acrylic paint, add an acrylic medium. Mix together with your paint using a putty knife and everything should be good to go.
If you’re using a stiff brush, this may also be one cause. Stiffer brushes require sufficient experience to use. Instead, try a brush with softer bristles. For paintings that require detail work, use a pointed round or round paintbrush.
Preparing your canvas ahead of time also matters. For example, adding at least one or two coats of gesso before painting should make your acrylic paint smoother.
Final Thoughts
There are several ways to save clumpy paint, be it through distilled water, an acrylic medium, surfactants, or straining.
So, you might be wondering as well… how do you know when it’s time to part ways with your acrylic paint?
First, if most of the paint has hardened or so dry it’s like knocking on wood, it’s a goner. This usually happens because it was exposed to cold temperatures and froze. Poor acrylics.
Second, if your acrylic paint smells funky – like sour milk. Or if you see mold forming, let them go. It’s sad, but hey, you have the perfect excuse to buy new acrylics and experiment with more paint colors. Yay!
I hope my whole article makes it easier for you to get desired results with acrylics!

Masha Eretnova, born in 1991, is a Chiang Mai-based certified teacher, artist, and blogger with 20+ years of personal painting journey.
She started painting and drawing very early and is now an international abstract artist and educator passionate about acrylic painting, gouache, and crafts.
Her works are part of international exhibitions and contests, including ArtlyMix (Brazil), Al-Tiba 9 (Spain), Exhibizone (Canada), Italy, and many more.
Besides her artistic pursuits, Masha holds a post-grad diploma in Teaching Film Photography and 2 music school diplomas: piano and opera singing.