Last Updated on December 20, 2023 by Masha Eretnova
If you’re interested in learning more about acrylic pouring techniques, then this blog post is for you! We’ll go over the basics of what acrylic pouring is and why it’s so popular.
Then we’ll show you 33 impressive acrylic pour painting ideas that are sure to provide inspiration for your next project. So grab your paints, cups, and canvas because after reading this post, you won’t be able to stop thinking about all of the possibilities!
Acrylic pouring is a great way to get your creative juices flowing and make something beautiful. If you’ve never tried pouring acrylics before, the following acrylic pouring techniques for beginners are perfect for you.
And if you’re more advanced, you can jump to the section on advanced acrylic pouring techniques – they can be used as inspiration or starting points for your own paintings! Let’s dive in…
Table of content:
- What is acrylic pouring?
- A quick recap for pouring supplies & FORMULA
- 33 Acrylic pouring techniques
- FAQ
What is acrylic pouring?
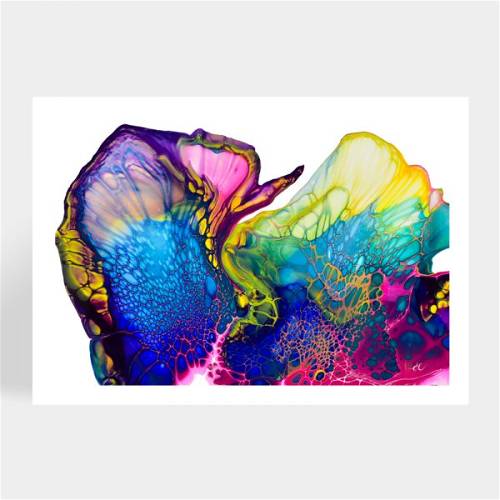
Acrylic pouring is an acrylic painting technique AKA fluid art when you literally pour fluid paint onto the painting surface (canvas, wooden panel, or board) creating patterns.
You do not use brushes to paint or water to thin the paint, instead, you use fluid paint with an acrylic pouring medium and one of the many acrylic paints pouring techniques.

Acrylic pouring needs some special supplies, like pouring medium and cups, but it is easy, fast, and fun to experience.
Acrylic pouring is a general name for a family of pouring techniques from easy ones to unusual acrylic pouring techniques.
The key to success in acrylic pouring art is good fluid paint and a bit of practice.
To learn more about acrylic pouring and how to do it, continue reading my full guide, or you can also read some books:
- The Paint Pouring Workshop: Learn to Create Dazzling Abstract Art with Acrylic Pouring (900+ positive reviews on Amazon) by Marcy Ferro – founder of the Mixed Media Girl YouTube channel. 128 pages.
- Paint Pouring: Mastering Fluid Art by Rick Cheadle. 128 pages.
- Compendium of Acrylic Painting Techniques (includes pouring too) by Gill Barron. 176 pages.
Read also:
- Why Is My Paint Watery? 15 Ways To Thicken Paint
- How to Fix Lumpy & Chunky Acrylic Paint? [10 Easy Methods]
- 51 Simple Acrylic Painting Tips for Beginners & Pros
Acrylic pouring supplies you absolutely need
Before we move on to discovering and practicing different pouring techniques, I’ll quickly remind you what we need to do in a pour painting.
Essential Acrylic pour supplies
- A canvas (or any other shape, or gesso board, or a wooden panel) – I really recommend cheap and high-quality Blick canvases.
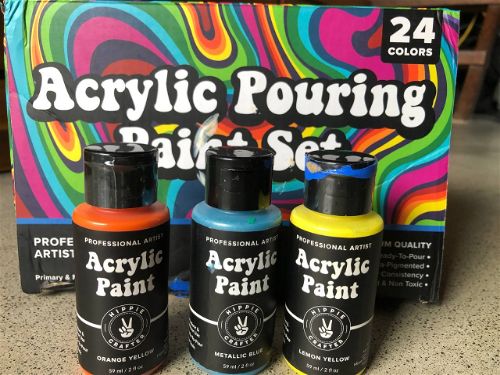
- Acrylic paint or acrylic pour paint.
- Pouring medium.
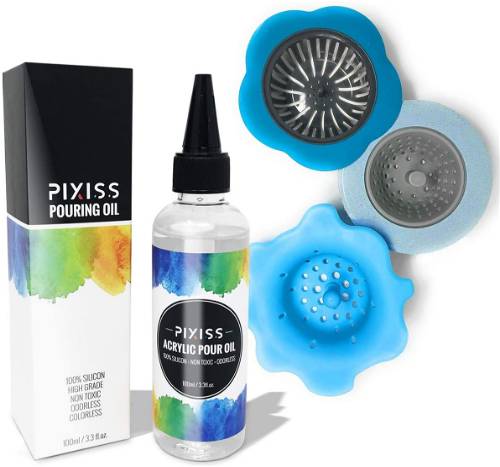
- 100% silicone oil to create cells: Impresa Pouring oil for large cells or Impresa Silicone oil for multiple smaller cells.
- Plastic cups & stir sticks.
- Trash bags or newspapers to protect your working area.
- Acrylic sealer to protect finished pour.
- Torch or a heat gun to remove bubbles.
Extra supplies
- Palette knife (for swiping) – I use cheap Conda knives for 2 past years.
- Sisal cord/string for String technique
- Gloves & apron to not mess up yourself.
- Gesso, I use Liquitex Basic Gesso.
- Squeeze bottles to premix colors.
- Tin foil sheet pan to collect all drips.
- Glitter for special effects.
- Hairdryer or straw for blooming.
If you feel overwhelmed, for the first try just buy a ready-to-use acrylic pouring set that normally includes all needed supplies, even cups! Here are tons of good options for acrylic pouring kits for beginners.
New pouring techniques supplies
The market is constantly producing some new tools to make our creative journey easier. Not always new things work better than old school ones, but I’m happy to share what I’ve found:
What is an acrylic paint pouring medium?
A pouring medium is why the magic happens, without it you will get no pouring process at all. Basically, it is an additive that you add to your paint to increase acrylic paint flow and make fluid acrylic paint.
Yet, it doesn’t work like water, it is not just thinning the paint. It keeps the color vibrant and helps the paint create nice patterns.
Almost all popular brands produce their pouring medium that goes well with their paint. However, there are some top recommended pouring mediums: Floetrol, Liquitex Pouring Medium, and Golden GAC 800.
To learn everything about pouring mediums and Floetrol, please read my full guide:
Floetrol for acrylic pouring: Full Guide [Floetrol Recipe & 9 Substitutes]
You use a pouring medium with regular acrylic paint to turn it into pour paint.
Sometimes you can buy already premixed paint for pouring, they normally don’t need you to add any more pouring medium, but! I’d still have some pouring medium, as the paint consistency of premixed paint may not be perfect.
ACRYLIC POURING RECIPE (How to thin acrylic paint for pouring)
- Pouring recipe with Floetrol: 2 parts Floetrol to 1 part paint. Plus 2-4 drops of silicone oil for cells. OR 50% floetrol, 30% paint, 20% water + silicone oil.
- Pouring recipe with Golden GAC 800: 2.5 teaspoons Golden GAC 800 to each paint cup.
- Pouring recipe with Liquitex Pouring Medium: 1 heaped tablespoon of paint to 1 cup of Liquitex Pouring Medium.
- Pouring recipe for cells with dish soap by Olga Soby: add 2 drops of soap in each premixed color with pouring medium.
Read also: Floetrol for acrylic pouring: Full Guide [Floetrol Recipe & 9 Substitutes]
Acrylic pouring techniques that look GORGEOUS!
Here I will introduce you to acrylic pouring techniques, some of them are more common and easier, and some of them need more practice and time.
That’s why I will split them into two sections: pouring techniques for beginners – they are easy, quick to learn and need fewer additional supplies, and advanced acrylic pouring techniques – they may need some practice.
The most popular acrylic pouring techniques for beginners are marble pour, dutch pour, dirty pour, and flip cup, sometimes combined with swipe technique and a hairdryer use.
Amazing results with a little bit more time you’ll get with Swipe and String pull painting techniques.
The most difficult advanced acrylic pouring technique is Dutch Pour with Lacings: Shelee Art technique.
All acrylic pouring techniques:
Advanced acrylic pouring techniques
- Flower Pour Technique
- Cells with a palette knife
- Tree Ring (Swirl Pour) pouring technique
- Wing Pour
- Swipe Technique
- Ghost Pour
- String Technique
- Fractal Dendrites
- SheleeArt Bloom Technique (Dutch Pour with Lacings)
- Balloon Dip Pour
- Dip Pour
- Colander Pour
- Funnel Pour
- Wave Pour
- Injection Pour
- Web Pour
- Double Cup Pour
- Multi-canvas Pour
- Hammer Pour
- Ripple Pouring
To choose beautiful color palette check out my collection of 38 Stunning Paint Pouring Color Combinations
Easy acrylic pouring techniques for beginners
1 – Traditional Pour
The traditional pour is the easiest way to go with acrylic pouring for a beginner, yet, it doesn’t offer the same amazing effects as other pouring techniques will do.
You only need your premixed paint and the canvas.
How to do Traditional pour painting:
- Premix the color in individual cups with pouring medium.
- *Add 2-3 drops of silicone oil to the cups to create cells (you can skip this step).
- Pour each color separately on the canvas in lines, circles, any directions and places you’d like
- Tilt the canvas and enjoy. Done! 🙂
2- Puddle Pour Technique
Using the Puddle Pour technique we pre-mix each color individually and we pour them one after another on the center of the surface, ex. canvas. We usually choose one basic color we pour first.
Puddle pour is a traditional pour technique and will be perfect for someone who wants to begin pouring.
The ratio to premix each color:
Use basic acrylic pouring recipe 1 part regular paint to 1 part pouring medium or
2 parts fluid acrylic paints to 1 part pouring medium
To create cells we use 2-3 drops of silicone oil that we add to the cup. To get even more cells you can upgrade your technique and combine it with the Swipe pour technique that I’ll list below.
Once all colors are poured, we move and tilt the canvas surface to make the paint spread over the surface.
To make your pouring even more interesting you can create many “centers” to pour, and also use a brush handle to create a tail and mix paint before you start tilting.
3 – Dirty Pour Technique (aka Dirty Pour Cup)
The dirty pour method is when we premix each color in an individual cup, but before pouring it onto the canvas, we pour all premixed colors in one cup, and then, we pour this mix on the surface.
How to do acrylic pouring with Dirty pour cup:
- Premix the color in individual cup with pouring medium.
- Add 2-3 drops of silicone oil to the cups to create cells (you can skip this step).
- Pour all colors in one cup.
- Pour on the canvas 🙂
To achieve needed effects we will still move and tilt the canvas.
4 – Open Cup Pour
With the open cup pouring technique we do everything like for the Dirty cup, except we do it immediately on the canvas because we place a cup with cut-off bottom there!
It is better to have a pillow layer for this technique.
- Premix the color in the individual cups with pouring medium and silicone (if you want cells).
- Pour pillow layer
- Cup one cup in halves and place over the pillow layer
- Pour all colors into this open cup. You will see the paint escaping the cup – it is ok!
- Gently remove the cup and tilt or spin the canvas.
5 – Flip Cup pouring technique
The Flip Cup painting technique is similar to Dirty Pouring: we mix each color individually, pour all premixed colors in one cup layering them, and then, we quickly turn the cup down and place it vertically on the surface.
To have more fun and cells, combine the Flip cup technique with the Swipe pour technique (which requires something to swipe with), see the instructions below.
How to do Flip cup pouring
- Premix color with pouring medium and silicone oil (for cells) individually.
- Pour all colors in one cup, layering, without mixing them.
- Turn the cup down and put it on the surface – do it quickly!
- Let it sit for couple of seconds to let all paint go down.
- Carefully lift the cup up.
- Add colors if you need.
- Tilt and move canvas until the whole surface and edges will be covered.
The one I created:
6 – Flip & Drag Pour Technique
To elevate the flip technique, you can drag the flipped cup across the canvas creating a colorful tail! This technique creates unique, fluid, mesmerizing designs and it is still easy and beginner-friendly!
How to do Flip&Drag cup pouring:
- Premix color with pouring medium and silicone oil (for cells) individually.
- Pour all colors into one cup, layering, without mixing them.
- Apply pillow layer (background color)
- Turn the cup down and put it on the surface – do it quickly!
- Gently drag it creating the directions you want (wave, lines, swirls)
- Carefully lift the cup up.
- Add colors if you need them.
- Tilt and move the canvas until the whole surface and edges will be covered.
7 – Air Swipe (aka Dutch Pour) Technique
Dutch Pour technique is the absolute winner if we talk about spectacular and easy results.
And it is absolutely accessible for a complete beginner, this is what I like about pouring – so much space for creativity and you don’t have to use a lot of difficult techniques or sophisticated supplies!
Dutch pour is often called the AirSwipe acrylic pouring technique, as there is a regular Swipe technique when we drag a flat tool over the paint to create cells, but with Air Swipe we use air – a hairdryer is the most simple example, that everyone has at home.
The beauty of this technique is there cannot be two identical patterns – every new canvas will be amazingly unique!
Extra tools you may need:
- hairdryer (you can also use a straw).
- silicone is a must.
How to do Dutch pour
- As for Puddle pour of Flip cup, premix colors with pouring medium and silicone individually and then layer them in one cup.
- Flip the cup onto the canvas and let it sit so all paint will go down. Don’t move the cup.
- Pour the background color (negative color) around the cup.
- Lift up the cup and make sure all the paint is on the surface, move the cup if there is more paint left.
- Tilt the canvas of let the colors as they are (based on your idea nad preferences – experiment!).
- Use a hairdryer on cold settings to blow colors into the negative color.
*Dutch pour can be done without flipping the cup – you can add color individually, forming lines, circles or any other shapes you like! Be creative!
Technically, you can use hairdryer with any technique – there is NO rules!
The results are just stunning! Here is a nice Youtube tutorial made by an artist:
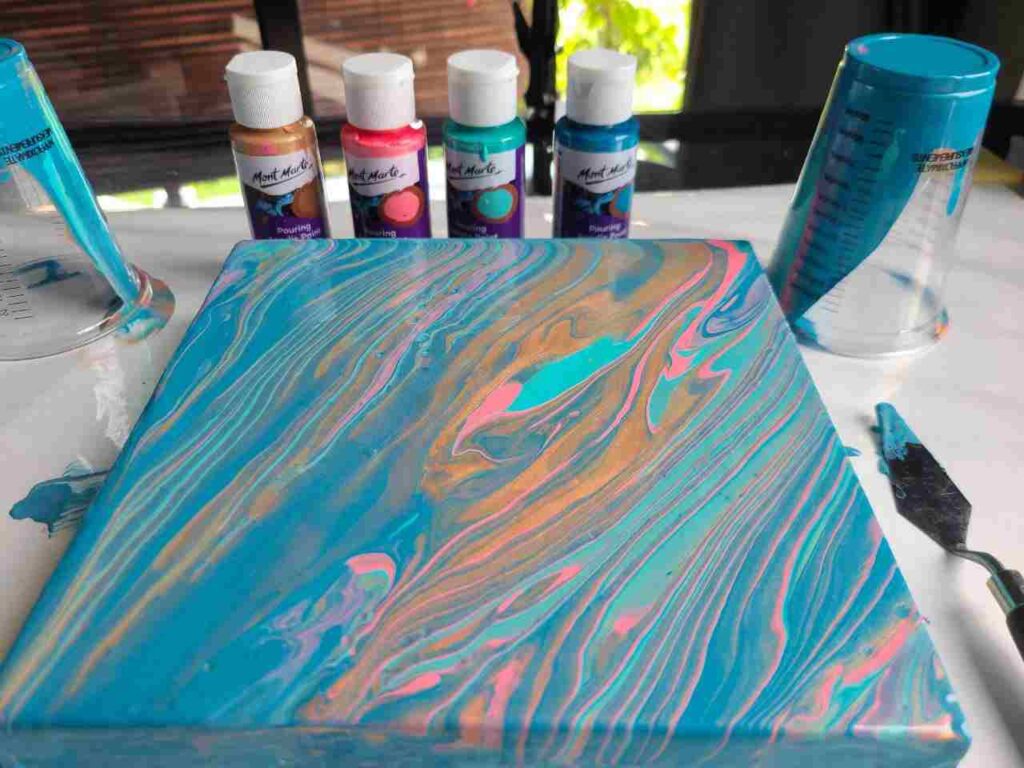
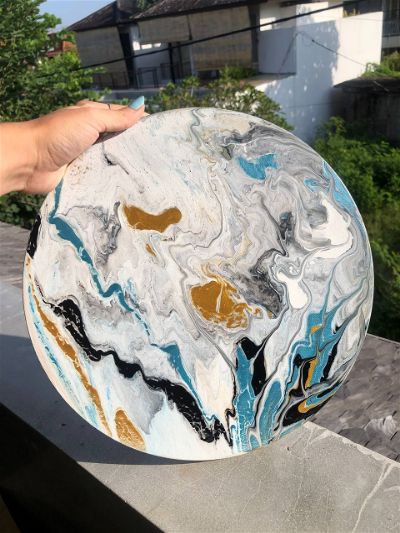
8 – Marble Pour Technique
One of the most beautiful, best-selling, and most spectacular techniques is the Marble pour technique when we are basically faking marble on our canvas. It is MY favorite!
The base for this pouring technique can be any of beginners’ acrylic pouring techniques, ex., dirty pour. But some artists claim that Flip cup is the best for marble as it guarantees the best blending, which makes perfect sense.
Yet, this technique is tricky because you need to be very careful with acrylic pouring color combinations: look up some real marble and try to stay at max 3 shades of the same color.
How to do Faux Marble pour
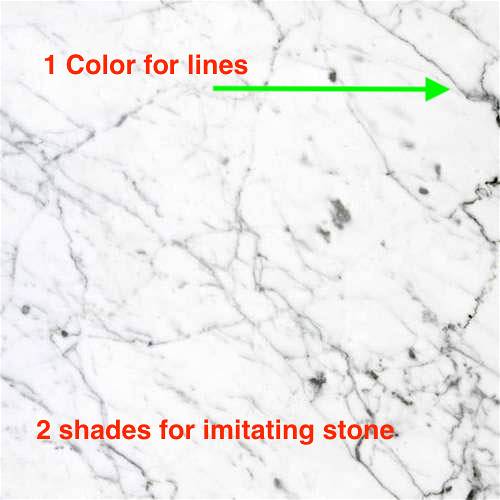
- Choose color and its shades, premix them with pouring medium (total 3 colors).
- Pour 2 major marble colors in one cup.
- Pour this cup onto the canvas following the direction you want. Set the color that will make lines that natural marble has.
- Correct the edges if needed, tilting
- Take the “marble line” color and make likes. Make lines go over edges and cross each other (look at how natural marble lines go).
- Tilt again gently to make lines flow naturally with other colors.
ALTERNATIVELY
- Premix color like for Flip Cup.
- Flip and drag the cup across canvas.
- Tilt (add more paint if some areas remain uncovered) and shake.
- Done! So easy 🙂
Insider tip: making lines of metallic acrylic paint will create extra wow effects!
Shannon made a stunning marble design here:
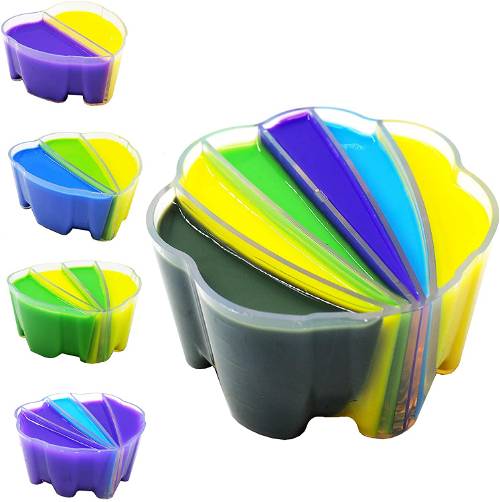
9 – Split cup pour
Split Cup Pour is all about the right cup, precisely the new invention that we have now sold on Amazon – a special split cup for acrylic pouring techniques.
They can have from two to 5 sections and will help you create interesting pours.
Some artists make DIY split cups with two sections just by inserting a plastic sheet in a cut bottle or a cup.
Extra supplies for Split cup pour – a split cup of your choice!
The split cup is super easy to use because you premix each color in an individual section, but once you pour the paint, they will all come out together, mixing and blending! The split cup makes Wing Pour EASY even for a beginner, so you can try it out.
How to do Split cup pour
- Premix colors with pouring medium in individual sections.
- Start pouring! You can use circular movement like you do with Tree ring pours, but now you can move back and forth.
- Once you’ve done pouring, tilt the canvas to spread the paint. Done!
Look at this pour painting Tracie made – this is a must-see and sooo easy:
10 – Kiss Pour
Kiss pour is close to a split cup but you actually have two cups you are pouring from at the same time. Why it is called kiss pour? Because our cups are kissing 🙂
It is an amazing technique to create some dualistic designs, as in these two cups you can premix completely different palettes (like for dirty cups).
Olga Soby inspires hundreds of artists and she has a few kiss pours on her channel:
11 – Comb Pouring Technique
Comb pours are surreal, they create such hypnotic patterns that you cannot mistake this technique for anything else.
When you see a poured comb painting you think it is difficult to do, but in fact – no.
Let’s try.
- Premix all colors with the medium in individual cups
- Get a regular hair comb ready (of course, it is better to use the one you don’t brush your hair with as paints can be quite harmful). How far the teeth are one from another will influence the distance between lines in your pour, so you can experiment with different combs!
- Pour all premixed colors into one big cup.
- Pour the paint ( you can do swirls, circular movements, flip cup or experiment)
- “Brush” the paint with your comb creating lines and waves:
12 – Spin Pour
Tilt, tilt, tilt…stop! We can SPIN! This technique is relatively new and someone truly genius used turntables (yes, the ones people use for cakes or pottery) to create pourings! No matter what technique you choose, you can spin instead of tilting.
Well, yes, it can get messy, but it is so much fun! The only thing you need is to buy a turntable 🙂 Either spin inside a very large plastic container or “build” a little fence around your canvas to make sure the paint will stay inside.
13 – Marble roll pour (aka Inverted marble)
Another super easy but creative pouring technique is to use a heavy marble and let the ball roll across the poured paint, creating absolutely stunning results.
So you first pour the pillow, then premix and pour the colors and then drop the ball and tilt the canvas like playing a Ball–in-a-maze puzzle!
Advanced Acrylic Pouring Techniques
(need a little bit more patience and practice)
In my classification, advanced acrylic pouring techniques need either more experience and practice or some extra supplies.
In general, advanced acrylic pouring is for those who feel comfortable and can control the paint and its flow, master different basic techniques and have already created some pour paintings before, and are ready to move on!
14 – Swiping Cells with a palette knife
There are only two kinds of people: those who don’t like cells and who NEED MORE CELLS! Haha.
While there are tons of recipes for creating cells (even without silicone), there is also an elegant technique how to make cells pop in your pour – with a palette knife!
- First, you need a pillow layer
- Then premixed colors with pouring medium go onto the canvas
- Pour the cell activator onto a palette.
- Dip the palette knife in it.
- With a palette knife gently and rather slowly swipe the paint, watching cells forming. Amazing technique for waves. There are different shapes and sizes of palette knives and you can use any of them – experiment!
- After each swipe clean the knife with a towel and repeat steps 4 and 5 until you are happy with your pour 🙂
- You can leave it or tilt and stretch the paint a bit more if needed
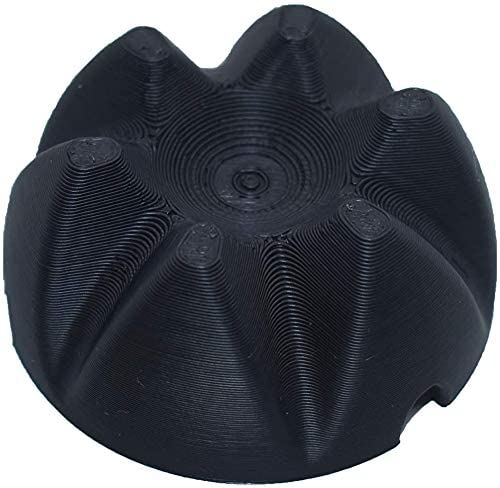
15 – Bottle Bottom Puddle Pour: Learn Flower Pour
Bottle Bottom Puddle Pour, also called the Flower Pour technique, needs one extra tool – the bottom of the plastic PET bottle (size is up to you).
You will pour premixed colors in the center on the bottle bottom and paint flow will create flower patterns.
What you need:
- Plastic bottle bottom or special Flower cup stand.
How to do Flower pour:
- Premix the colors with pouring medium.
- Place this bottle bottom on the canvas legs up.
- Pour colors one after another in the center of the bottle letting them run down on the surface.
- When you achieve desired flower pattern carefully remove the bottle bottom
- Pour a color in the center (where the bottle bottom was).
- Let it be, or using a brush end create effects, or tilt the canvas. You can also make it more abstract using a paper towel (watch the video below).
If you want a background color and very distinctive flowers on it, pour background color FIRST, before you place the bottle.
16 – Tree Ring Pour / Swirl Pour Technique
With the Swirl acrylic pouring technique or also called Tree Ting pour due to similarity, the paint is carefully applied to the canvas with circular movements, creating a pattern that resembles the annual rings of a tree.
Extra supplies:
- You can use a split mixing cup for this technique, but it is optional.
My work with swirl:
How to do Tree ring acrylic pour painting:
- Mix each color individually with pouring medium.
- Pour them, layer by layer, in one large cup.
- Start slowly pouring the paint moving your hand in tiny circles, imitating tree rings. The movements should be gentle, slow and without a lot of space between them. You may want to start at one edge and move slowly to another one, but some artists also do it in circles.
- Once it’s done, you again can tilt the canvas to help paint spread around.
Tree ring pours are mesmerizing to watch: paint flows and covers the entire canvas.
17 – Wing Pour Technique
The Wing Pouring technique is a modified Swirl Pouring, but this time we are trying to imitate wings.
To do so we need to create two mirrored pours. It is one of the relatively new acrylic pour techniques and as we need to get “wings” quite symmetric and equal, it may be challenging for a beginner.
How to do Wing acrylic pour painting:
- Mix each color you’ll use in an individual cup.
- Then you start layer the colors in a large cup:
- first goes the background color, which will later appear in between the wings
- then, pour the color you want to be inside of the wings: you pour it on one side of the cup.
- you can add some of the first color again, it will create a contrast when you will pour. But it is optional.
- now you need to pour in the cup a high-contrast color in a circle – only on one edge of the cup!
- you can repeat step 4 with as many colors as you wish. All these color will be on the outside of the wings. If you do so, add first color in between, to add more contrast.
- Now we can start pouring:
- First, raise the canvas on your side. You can use cups or special elevating stands.
- Pour and spread the background color.
- Start pouring the paint mix in the middle quarter in a constant even flow.
- You can lift gently the canvas to create a long wing, but this step takes a lot of practice and can easily ruin the whole thing.
As you see the tricky part is the cup and layering the colors.
That’s why many painters are trying to invent homemade tools and cups that will ease the process and guarantee the wing pour to be successful.
One of those tricks is the Soulmate technique and another is kinda cup in the cup system.
I understand you need a visual guide, so I found this amazing video on Youtube, I hope it will make everything clear and less scary.
18 – Swipe Pouring Technique: We need More cells!
The swipe pouring technique (also called the wiping technique) can be used alone or combined with other pouring techniques.
The Swipe technique creates lots of cells and to do so we use a palette knife or a cloth.
The best techniques combination is Puddle pour or Flip cup + Swipe pour.
Extra supplies:
- spatula or palette knife (or even a piece of cardboard)
- silicone is the must in this technique, you can’t skip it in the recipe!
How to do Swipe pour:
- Premix colors individually with pouring medium and silicone, and layer them like for Puddle Pour technique.
- Premix more paint with pouring medium but without silicone in individual cups, don’t mix in one cup.
- Pour the paint with silicone on the canvas.
- Pour the color without silicon over it and using a palette knife or a spatula drag the paint. You will see cells appearing!
- Repeat until you like the results.
*Alternatively, you can just apply the colors individually on the canvas and then drag a piece of cardboard or a spatula across.
19 – Ghost Pour
The Ghost Pour technique is a variation of the Swipe Pour technique. With the Ghost pour, you swipe from the middle of the canvas creating mirrored patterns.
It can be with or without cells, based on your preferences.
This technique needs a piece of cardboard or something to swipe (palette knife, plastic sheeting).
How to do Ghost pour:
- Premix colors individually with pouring medium and silicone oil, if you want cells.
- Pour and spread the negative color (your background).
- Start pouring colors one next to another in the middle of the canvas, making lines or circles (based on your idea and inspiration). You pour them at the point from where you’ll swipe them in two opposite directions. You can premix two colors and white/black and alternate the lines: ex., gold, white, silver, white, etc.
- Now to swiping! Make sure your swiping tool is clean and dry! Start pulling the paint from the middle towards the edge.
- You can add more color and swipe again until you like the outcome.
- If you added silicone oil, use torch to make cells visible.
Beautiful Northern Lights made with Ghost pour technique by one of the pouring artists:
20 – String Pour Technique (String Pull Pour/Chain Pull Technique)
The string pour technique actually needs one or several strings (like a sisal cord) to create a pattern: a feather is the most popular design you can make with a string.
String pour technique is not easy at all, it takes time and practice.
Extra supplies:
- string (jute or crafting twine, or medium to thick yarn).
How to do String pull pour:
There are several approaches on how to do string pour: some soak strings in paint before pouring, some put the string straight and cover it with paint…or don’t. It doesn’t really make a difference – it is a matter of habit and preferences.
- Premix every color in an individual cup with pouring medium.
- Pour background color (negative color) and spread it evenly over the canvas.
- Put 20-30 cm long strings in every color and let them soak the paint. Don’t let them sit in paint mixture too long though. OR, alternatively, you can put strings first in a cup and then layer all colors on top.
- Take the first string off the paint and layer it on the canvas: you can form a roll but not too dense or just zig zag lines. Repeat with all cords. Make sure the tail of each string is easy to access – usually, you will just leave it hanging over the canvas’s edge.
The pattern can remind flowers or feathers, look at these nice tutorials I’ve found on Youtube:
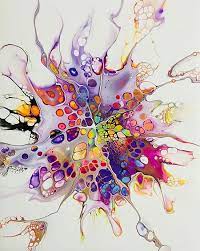
21 – Fractal Dendrites Pour
The fractal dendrites pour technique is one of the most beautiful techniques when we create structures like fractals and dendrites with pouring and alcohol.
We don’t have to paint fractals ourselves, “nature” or, precisely alcohol on the pour paint will make all the work. Once you let the first drops fall down, you’ll see the magic.
The principle is easy, yet, the amount of alcohol and the size of the stylus will affect the results. That’s why this technique is an advanced pouring technique – you need a bit more practice.
Supplies for Fractal Dendrites Pour:
- Isopropyl alcohol
- stylus (they come with clay tools sometimes) – you can choose different sizes.
- better use acrylic paint ink instead of regular paint or liquid paint.
- if you’re creating very large dendrites, you may need a pipette.
- silicone.
How to pour Fractal Dendrites:
- Premix with pouring medium and spread the background color (negative color) over the canvas.
- Pour a full pipette of acrylic ink color you like.
- In the center of the acrylic ink circle, put 1 drop of silicone oil.
- Next, add 1 drop of Isopropyl alcohol.
- Wait, be patient and watch the process start! If the process seems too slow for you, add more drops of alcohol.
Here Dirty Artists shows the experiment with Fractal Dendrites. You can follow the same process:
22 – Dutch Pour with Lacings: Shelee Art Bloom Technique
Shelee Art Bloom Technique consists of three layers, poured one after another and then, moved together.
Dutch Pour SheleeArt Bloom Technique is a much-complicated variation of the basic Dutch pour when we basically just need airflow.
This technique requires time, practice, and a special recipe.
Shelee created a large art school and tons of useful tricks for acrylic pour artists, including this lacing technique.
On her official website, you will find sooooo many beautiful tutorials and online courses for mastering her techniques.
Supplies:
- 1 Teaspoons
Titanium White paint, I use basic Amsterdam Titanium White acrylic paint - Liquitex Flow Aid Medium
- 4 drops Liquitex Acrylic Ink (if you have it)
- 1/2 Teaspoon Elmers Glue-All
- DIY Cell and lacing activator (recipe below)
- DIY pouring medium:
- 50% Behr High gloss Interior Deep base (or another deep base) + 25% Minwax Polycrylic + 25% Jo Sonja Varnish, OR
- just 3 parts Behr Interior High Gloss Enamel – Deep Base to 1 part Polycrylic
- 1 part of Minwax Polycrylic with 1 part of pouring medium
- Pipettes
- Acrylic paint colors you’d like to use
- Gloves
- Torch
*To substitute Floetrol, please check my list of 9 Floetrol substitutes.
Shelee Art Bloom Technique Recipe
For the first layer (cushion or pillow)
- The first layer is so-called “cushion” or “pillow”, we usually use
Titanium white mixed with Elmers Glue in ratio 1:1. - You may need to add a little bit of water, but do not overdilute the mixture – it should be still pretty thick.
How much paint do you need for the cushion layer? For a 15×15 cm canvas, you’ll need 100-120 ml of “cushion”.
For pouring medium (3 options)
- The easiest recipe: Mix 1 part of Minwax Polycrylic with 1 part of pouring medium. OR
- 50% Behr High gloss Interior Deep base (or another deep base) + 25% Minwax Polycrylic + 25% Jo Sonja Varnish OR
- just 3 parts Behr Interior High Gloss Enamel – Deep Base to 1 part Polycrylic
For acrylic pour paint
- Mix acrylic paint with Pouring medium in ratio 1 part to 3 parts in individual cups. It should be creamy and flow, but should be as fluid as regular pouring paint.
For Lacings and cells
- Mix Liquitex Flow Aid Medium with
Titanium white until the paint start dripping slowly, still being quite thick.
How to do Shelee Art Bloom Dutch Pour Lacing
- Apply the cushion layer and let it sit on the canvas, thick, don’t spread it over canvas. It should sit in one place.
- Working fast, drop some of first color, then second color and so on, until, the last color. You need to think about how colors will collaborate, but don’t worry, it can come over time with experience.
- Ass lacing mix, just 1-2 drops.
- Start blowing using just your mouth or a straw. Do not blow to hard and do not blow the cushion layer, only the color layers!
- If you want more cells, use torch in between “blowing” session.
- Once you done blowing and making cells, start tilting the canvas.
Alternatively, you can follow a 1-hour tutorial on Youtube by Kanella, who took the course and adapted different recipes too:
23 – Balloon Smash Acrylic Pouring Technique
The Ballon Smash acrylic pouring technique is literally what it sounds like: you create a pattern with an inflated balloon!
This pouring technique creates mostly flowers alike designs or abstract pours and easily can be combined with Dirty pour.
Extra supplies: balloons!
How to do Balloon Smash Pour
- Premix colors with pouring medium.
- Apply background (negative) color and spread it over the canvas.
- Pour colors on the canvas using your favorite technique: Puddle pour or Dirty Cup.
- Inflate a balloon! Not too much, just like a small ball (the size of the ball will dictate the size of your pattern, so you can easily control it or inflate several different balloons).
- Press the ballon against each poured puddle gently or with pressure – try it first to see which results you like more. The harder you press the larger design will be and the more effects you’ll have.
ALTERNATIVELY
- Premix colors with pouring medium.
- Pour the background color.
- Then take a tray and make puddles there. Not on the canvas!
- Inflate the ballon.
- Dip the balloon in a puddle, then transfer the pattern onto the canvas and keep going like that! This is why this technique is also called “balloon dip pour”.
You can always go further and use silicone to create cells or straw to create blows.
24 – Dipping pour
Another dipping acrylic pouring technique is a Dip or Dipping pour.
It is technically the case when we dip the canvas in the paint, so it is quite a complicated and advanced pour technique, I hope you’ll like.
Warning, this technique can create a mess 🙂
Extra supplies:
- a plastic sheet or a shallow tray (slightly larger than the canvas you want to paint onto)
How to do Dipping pour
- Premix all colors in individual cups.
- Apply the colors onto the sheet or tray using any basic technique you want. Not on the canvas!
- Now the dipping part: turn you canvas upside down and deep it in the tray.
- Let is soak the paint for 3-10 sec and lift it up gently.
- You can repeat the step 3 as many times as you wish!
25 – Colander Pour – Kaleidoscope fluid painting technique
Colander pour is used to create kaleidoscope effects, and as you may guess we will use a simple colander for it!
This is not a very difficult acrylic pouring technique, but it does a WOW-effect for sure!
Extra supplies: magical colander! (kidding, just a simple one from the store)
How to do Colander pour:
- Premix your colors with pouring medium and get them in one cup, like for Dirty pour.
- Place the colander (clean and dry!) in the center of the canvas.
- Pour the paint in the middle of the colander with circular motions, keep pouring until all paint will come out.
- Now paint will reach the holes and start pouring onto the canvas, watch it!
- Start lifting the colander very slowly straight up and hold it up until all colors come out. Don’t lift up too high, it will be not even 1 inch up.
- Set the colander aside. We don’t need it anymore.
- In the center of your canvas you should now see the famous kaleidoscope effect!
- Now start tilting your canvas gently to spread the paint across.
Beautiful Colander pour by Molly:
26 – Funnel pour
The funnel pour stays in the kitchen tools section, like a colander pour.
With Funnel pour we gonna use a funnel to get amazing cells and gorgeous effects, I promise!
Extra supplies: a simple funnel.
For any acrylic pouring technique I would suggest using a separate funnel, colander, or any other tool that may potentially contact our food. Acrylics are not food safe and even if we clean all tools thoroughly, I would still keep hobby and food separate.
How to do Funnel pour:
- Premix all colors you’d like to use in individual cups, plus a negative color (black, white) in another cup.
- Pour and spread the background color.
- Place the funnel over the canvas.
- Start pouring paints one by one, not all the cup, just layering it nicely. Better pour all colors from one side of the funnel.
- Once you done, slightly lift the funnel up and start dragging it around the canvas. The paint will flow on the painting surface, like the funnel has a tail. you can form lines or circles, it is up to you!
- Once the funnel is empty, you can add more paint on the edges of the pattern.
- Tilt. And wow, it is so pretty!
- *You can blow edges with a straw, torch cells and even swipe if you’d like to experiment!
I can’t hold to myself, this is just a masterpiece made by Olga with a funnel:
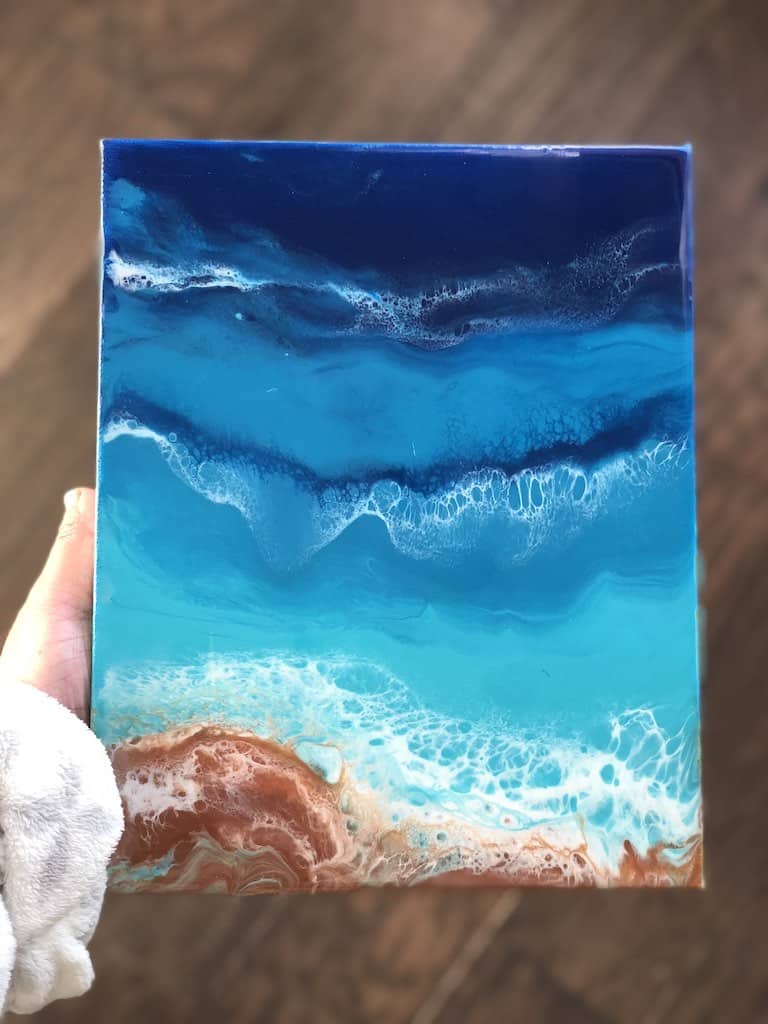
27 – Wave pour
One of the most popular acrylic pouring techniques is the Wave pour – so beautiful and reminds us of the ocean, how it feels, how it sounds and the warm water touches us.
Wave pour makes waves, but it doesn’t;t mean it always should be ocean blue, you can use any color combinations you want.
The Wave acrylic pouring technique may seem like a variation of the Swipe pour too, as we will need something to drag the paint to form a wave.
Extra supplies: something to swipe (large palette knife, paper towel, cardboard, plastic sheet, etc)
How to do Wave pour:
- Premix all colors with pouring medium in individual cups.
- Pour and spread the background color, if you’re doing the classic wave it will be white.
- Before you do the wave, sketch it in your mind, place it: where it should be? It is important to know as you we start pouring according to it.
- Start pouring darker colors where the bottom of the wave will be – there the water is darker. Probably it will be the bottom of the canvas as well, just pour one dark color from one side to another and same with other colors, you’d consider as dark and imitating deep water.
- On one side, pour light color (it can be grey, white with metallic), its where the wave starts to have some foam. Usually, it will be one side of the canvas somewhere in the middle of this side (middle right, for ex.).
- So far it looks nothing like a wave, don’t freak out!
- Now it is the most important moment, we are starting dragging a cardboard or a wet towel from the bottom of the wave to the top, imitating wave shape. You can use a palette knife as well.
- Repeat step 7 until you’re happy with how your wave looks like. After each swipe wait a little bit, so the paint will show the effect better, and then proceed.
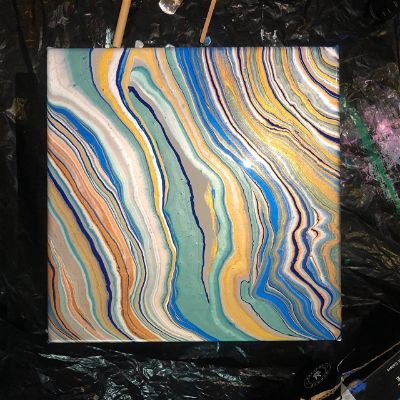
28 – Injection pour (aka Infusion pour) with a syringe
I’ve never heard of this acrylic pour technique before, so I started my research. Injection pour (also called infusion pour) uses a syringe to kind of inject the canvas with fluid paint.
Yet, not all videos you will find under the Injection pour tag will have a syringe, some of them will look like a puddle pour of some kind, so I got very confused, what is injection pour exactly?
I found no answer, but I’m still considering this pouring technique for what it stands for.
All techniques names are straightforward and I will think that this one too.
For me, injection is related to a syringe. From my understanding you’re injecting the paint into the paint – makes sense, right?
For me, the effect looks like natural stones slabs – very nice.
Extra supplies: a large volume syringe (30 ml or more, depending on the size of your work).
How to do Injection pour/Infusion pour
- Premix your colors with pouring medium.
- Flood your canvas with a background color, let it sit in the middle, don’t spread.
- Close the tip of the syringe with your finger and layer the paint colors in the syringe.
- Take off the finger and set the syringe in the centre of the background color. Slowly press and let the paint come out of the syringe, it will come out pretty much underneath your background color and you will notice how the colors start popping up.
- Once the syringe is empty, you are free to tilt the canvas now!
Alternatively, the injection can be done just with fluid paint bottles: you put the main color first, and then you just inject it with bottle lids with different colors.
29 – Web pour
Web pour technique creates mesmerizing webbing effects on the painting surface.
You will use a squeeze bottle to create a web of different colors on the surface.
Some artists say that this technique is the same as Injection pour (or Infusion pour), but I consider Injection pour like one with a syringe, so I will just briefly review the Web pour too.
Others see Web pour as a variation of the Fractal Dendrites pouring technique. I don’t know who is right, for me a web it’s a spider web and I’ll go with it.
The main difficulty with Web pour is that we don’t really control the results and it may become challenging to get the perfect web you want.
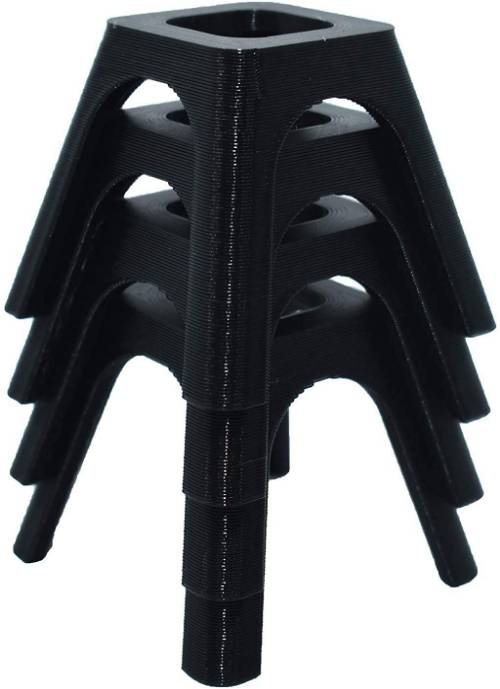
30 – Multi-Canvas Pour
Yes, now we go next level and we will pour at the several canvases at the same time.
The multi-canvas pour is ideal for creating matching pour paintings and has no leftover paint!
The main principle of a multi-canvas pour is that we stack several canvases like a pyramid, one on top of another, then we pour paint over the top canvas and let it flow down and flood canvases underneath.
Supplies:
- Several canvases (big – smaller – smallest)
- You’ll have to premix more paint, as we’re going to cover several surfaces.
- Elevator stands or extra cups for elevating canvases.
How to do multi-canvas pour
- Premix the colors as if you’re going to do a Dirty cup pour
- Stack the canvases:
- the largest at the bottom,
- the next one – smaller and elevated (use special stands or just plastic cups turned upside down)
- the top one – the smallest canvas.
- *It is best to stack them like a pine tree, not straight one under another, but both ways are fine.
- Start pouring premixed paint over the top canvas. Let all paint go down till the bottom canvas.
- Once you done pouring, take off canvases from this pyramid, tilt each one of them and let them dry.
Or course, you can paint multiple canvases at the same time without creating a pile, you can always layer them one next to another and work progressively on all painting surfaces.
31 – Two cup pour (Double cup pouring technique)
The two-cup pour technique is easy to understand: to create a pouring painting we will need two cups and these cups will be one inside another – boom!
You should choose one smaller cup and one bigger one and for this technique, the measuring cups with a handle are better. This technique is also called Double cup pouring.
Supplies
- Two cups with handle (it is easy to get a set of 3 cups, they are always matching and have bigger and smaller sizes).
How to do Two cup pour
- Premix your paint with pouring medium.
- Fill half the big cup with layered paint (or less, depending of how deep the smaller cup can fit it in the bigger one).
- Fill the small cup with layerd paint.
- Put the small cup inside the big cup – their top edge should be on the same level (that’s why is better to get a set, as they are matching).
- Now the difficult part, pouring the paint. There are several ways to do it:
- Put the canvas on top of the cups (one inside another) and flip it upside down.
- Flip the both cups like for Flip cup pouring technique (quite difficult).
- Just pour moving the cups in tiny circles like for Tree Rings pour.
- Carefully remove the cups.
- Tilt, add more paint, torch for more cells, do as you wish do get ideal result.
Galaxy Pour by Olga:
32 – Hammer pour
Hammer pour is not a very popular new acrylic pouring technique. Hammer pour is when we pour and splash paint on a hard painting surface (canvas will be too soft).
We can use a gesso board or a wooden panel and a hammer or mallet.
Supplies:
- Hard painting surface (wooden board). If you choose wood, make sure you will prime it first, otherwise, paint will not adhere properly.
- A rubber mallet is an ideal choice.
How to do Hammer pour
- Cover your working area with plastic and wear an apron (this technique is messy)
- Premix your acrylic paint with pouring medium.
- Spread the background color over the painting surface.
- Using Puddle pours or Traditional pours pour the paint over (feel free to experiment with any other basic acrylic pouring technique as a base for Hammer pour).
- Take a hammer and make splashes! Keep going, adding paint and splashing until you like the results. The harder you hit, the more splashes you get.
33 – Ripple Pour
I first saw Olga Soby – one of the greatest pouring artists – doing a ripple pour with a large funnel. It is so much fun for creating water reflections, galaxies, and just mesmerizing patterns!
She has many videos of doing ripple pours on her channels and I promise you won’t be able to stop watching:
Pour painting techniques FAQ
What are the different types of acrylic pouring techniques?
I differ acrylic pouring techniques by level: for beginners and advanced. Beginners’ pouring techniques do not involve special knowledge or any extra supplies (=extra costs), they are simple and quick. Advanced acrylic pouring techniques require more practice, patience, and sometimes extra pouring tools or even a special recipe.
The basic acrylic pouring techniques for beginners are Puddle pour, Flip cup, Dutch pour.
Advanced acrylic pouring techniques are String Pour, Marble Pour, Flower pour, Swipe pour, Shelee Art Dutch pour, Fractal Dendrites pour, and many more.
Read also: 25 Acrylic Painting Techniques For Beginners to Paint like a Pro
What is the best acrylic pour technique?
For me, the most spectacular, the best, acrylic pour technique is basic Dutch pour – gorgeous effects just with paint and a hairdryer! I also like beautiful cells with the Swipe technique and the simplicity of the Flip cup pour technique – just mix the paint and go!
The best technique for pouring for me is a combination! You can always add air, cells, create patterns with a funnel. Just have fun!
How do you get good cells in acrylic pouring?
The main ingredient to get good cells in acrylic pouring is good silicone oil.
100% silicone oil is the best choice: Impresa Pouring oil for large cells or Impresa Silicone oil for multiple smaller cells.
What is the formula for acrylic pouring?
Acrylic pouring relies on a good recipe because the paint flow is mandatory for good results. The best formula for acrylic pouring is to mix 1 part of Floetrol with 2 parts of the acrylic paint. Add then 2 to 4 drops of silicone oil to create nice cells.
Another popular formula for acrylic pouring is to mix 50% Floetrol, 30% paint, and 20% water, and then add silicone oil.
What do you do with leftover acrylic pour paint?
You can use it to paint with! The consistency will be very high flow but the paint will show up transparent. You can also use leftover paint to pour on some small objects such as rocks, shells pieces of wood, or other small objects. Premixed acrylic pours paint can stay good for a few days if you will properly close the lid.
Need inspiration? Check my 101 painting ideas for beginners and try them!

Masha Eretnova, born in 1991, is a Chiang Mai-based certified teacher, artist, and blogger with 20+ years of personal painting journey.
She started painting and drawing very early and is now an international abstract artist and educator passionate about acrylic painting, gouache, and crafts.
Her works are part of international exhibitions and contests, including ArtlyMix (Brazil), Al-Tiba 9 (Spain), Exhibizone (Canada), Italy, and many more.
Besides her artistic pursuits, Masha holds a post-grad diploma in Teaching Film Photography and 2 music school diplomas: piano and opera singing.
Can I somehow do acrylic pouring on my bathroom walls
Hi, Maddy! I’m afraid the surface should be horizontal, like panels or tiles, for the pouring itslef and drying. And then it can be put vertically…So technically you can pour on each tile individually (waterproof it) and then set them up on the wall…but if we are to pour some fluid acrylics on the wall I’m afraid they will drip and flow down under the gravity 🙁 I don’t know of any other way I’m so sorry