Last Updated on November 19, 2023 by Masha Eretnova

When we create something art as part of memories, a hobby, or for sale we should think about protection. Art is something we need to take care of and make sure it will last years and years to bring joy and inspiration. How to protect acrylic paintings on canvas? Or acrylic pouring?
The most common way to protect acrylic painting on canvas is varnishing. But it is not the best protective option. To ensure the best protection for your painting, consider 5 steps: primed canvas, isolation coat, varnishing, UV-protected sheet with framing, and proper maintenance. Proper maintenance and storage are vital for acrylic painting protection.
It is easier to protect your painting than fix cracking and peeling off or yellowing later. Use my tips for protective finish application and maintenance of your acrylic paintings. I also included the list of recommended products for each step.
Many posts on the Internet make protection equal to varnishing but it is not fully true. The protection of the painting doesn’t begin and end with varnishing. Varnishing is only one of the elements of good protection. Moreover, there is a better alternative to varnishing, but bloggers don’t really mention it. Feel free to read and use all the recommendations.
In this article:
- 5 steps to protect acrylic paintings on canvas:
- Why you need to protect acrylic paintings
- 11 Best products to protect the acrylic painting
This article may contain affiliate links to Amazon and Blick Art Supplies store. This means no extra cost for you, but it is the way you can support my blog because I will receive a tiny commission. Thank you!
Before we start: How to Use Acrylic Paint: 3 Easy Steps To Paint With Acrylics On Canvas
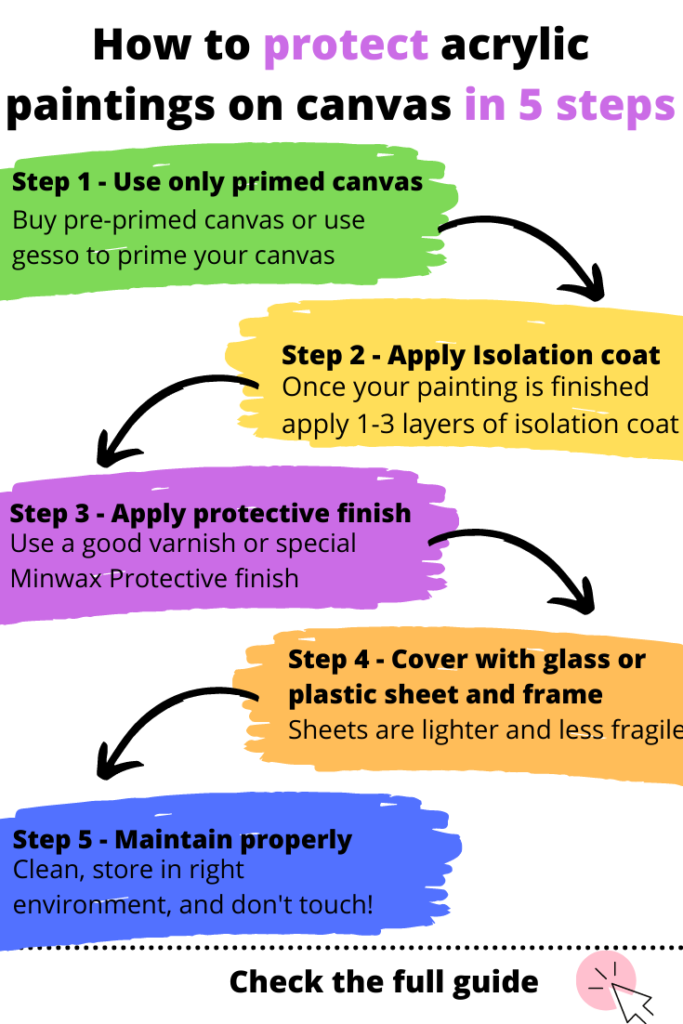
5 effective steps to protect acrylic paintings on canvas
You can easily protect your acrylic painting on canvas for years by following these 5 steps:
- Prime your canvas before painting with gesso or use pre-primed canvas
- Apply isolation coat once your painting is done
- Varnish your painting after the isolation coat is dried or choose a good protective finish
- Additionally, you can always put your painting under glass or plastic and frame it to protect it. This is step is not mandatory but depends on your preferences and choice.
- Properly maintain and store your acrylic painting to protect it from temperature, sunlight, humidity, mold, airflow, and cracking.
Do not use hairsprays as protection. Hairsprays composition doesn’t contain anything protective for acrylics but can easily take away paint.
Read also:
- Is Acrylic Paint Waterproof? 11 Ways To Make Acrylics Waterproof
- How to Clean Acrylic Paint Brushes [The Ultimate Cleaning Guide]
Step 1 – Prime canvas to protect the future painting
The most common way for beginners is just to buy a pre-primed canvas. They can be bright white or black. It is the easiest way because you can directly start painting.
If you’re using raw canvas, consider priming it with gesso. Gesso – is the most used primer. Gesso will help to smooth the canvas, but most importantly – the gesso increases paint adhesion which means no cracking and proper painting protection.
Priming canvas with gesso is extremely easy. You buy gesso at an art store or online (I use Golden Gesso), take a separate wide brush, and apply gesso in 1-3 layers based on how smooth is the surface.
Some artists make homemade gesso to protect the canvas, in my Gesso guide I share recipes, how-tos, and recommended gesso.
Read also: Is Gesso Really Necessary for Acrylic Painting? 4 Easy Homemade Gesso Recipes
Step 2 – Apply isolation coat to protect painting before varnishing
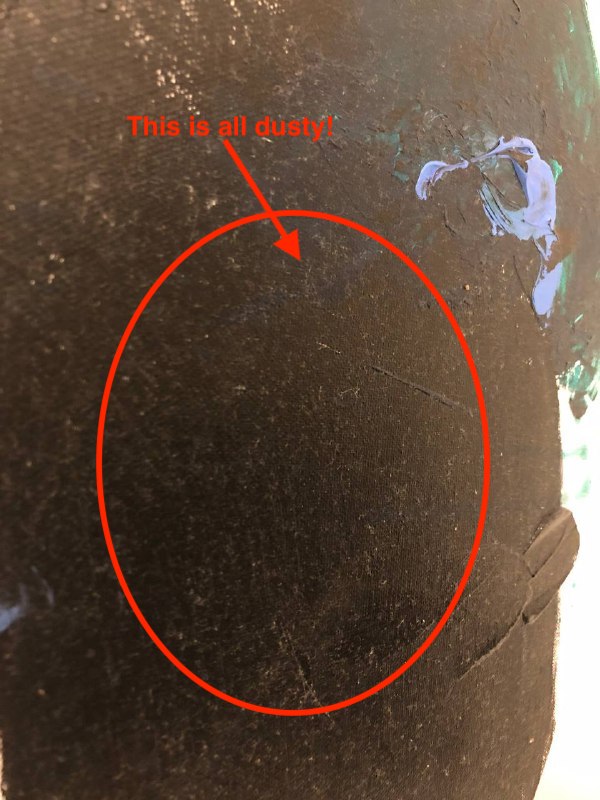
As we know, varnish became a synonym for protection. But the thing is, you need to remove and replace varnish when it becomes yellow and extremely dusty.
The reason why it is important for protection is when you’re removing varnish you can accidentally damage the painting without any option to save it.
To properly apply varnish and protect your painting, you should first apply an isolation coat that creates a barrier between painting and varnish. This way you can remove varnish when it is necessary without any side effects.
You can buy directly a jar of Isolation coat, like Golden (they have 5 different options). There are some tricks about the application of isolation coat, feel free to read the related post.
Step 3 – Varnishing or protective finish to protect the painting from dust and the environment
This section talks about 2 alternatives: the old and still popular method – varnishing, and the modern way to protect paintings – protective finishes.
- Should I Varnish My Acrylic Painting? 6 Solid Reasons
- all you need to know about varnishing
- why you may want to opt for a protective finish
Old school – Varnishing
Varnishing helps seal the surface and create a non-porous surface (dust and dirt tend to be collected in micropores).
It collects all dust and yellowing and when you remove varnish and replace it, the painting looks freshly finished. A proper varnish will increase color saturation and create a finished look. To learn about the 6 main functions of the varnish, check this post.
To smooth surfaces choose brush application, but if your surface has texture, opt for spray varnishes like Grumbacher spray varnish.
If you choose permanent varnish, you won’t be able to remove it, and the dust or yellowing that it gains over time.
Thinning would be the case with solvent-based varnishes. I don’t like to make things complex so I stick to water-based Golden Polymer removable varnish.
How to varnish an acrylic painting:
The time needed: 30 min and 24hrs at least for drying
Supplies needed: separate flat large brush, clean container, varnish of your choice
- Apply an isolation coating first. Let it dry for 1-2 days.
- Make sure the surface is clean. Wipe the painting with a lint-free cloth.
- Prepare the workplace: get a flat, large, clean brush – use a separate brush that you don’t use for painting. Thin the varnish if the brand recommends it. Get a clean jar or container and fill it with a bit more varnish to make sure you have enough.
- Place the painting horizontally in a flat and dust-free room.
- Apply the first coat of varnish. Work quickly, don’t press on the brush, move from the top to the bottom and from one side to another. Don’t go back over not dried varnish
- Let it dry (24hrs) and apply up to 3 coats.
- Check the surface from an angle to make sure there are no uncovered areas.
The full process of how to varnish an acrylic painting with a brush, with spray, and how to remove varnish is explained here.
Protective finishes
On the other side, there are protective finishes. Varnish is also a protective finish, but some modern artists find it outdated. It is partly true because historically varnishes were used to seal oil paintings and they contained alkyd resin, oil, and solvents.
In fact, the varnish is a tricky thing. It can get milky when dried and you will need to remove it immediately, it tends to yellow over time and it scares beginners and some Pros…
Yes, nowadays manufacturers use high-quality ingredients for varnishes but there are still some good alternatives.
To protect your acrylic painting you need a protective finish to be:
- Water-based (oil-based won’t work for acrylics!)
- Non-yellowing
- Glossy finish (or matte or satin if you prefer). Here is the explanation what the difference.
- Self-leveling – means it can create even non-porous surface
- No brush strokes
Minwax Polycrylic Protective Finish – is one of the best protective alternatives to traditional varnish.

- not yellowing over time
- protect from color running, discoloring, or hazing
- comes in matte, satin, semi-gloss, and gloss
- spray (which means no brush strokes) or for brush application
How to protect the acrylic painting with MinWax Protective finish:
Supplies: Protective finish, foam brush
- Wait until your painting is fully cured. The manufacturer suggests waiting 30 days.
- Work in a well-aired, dust-free room. Place your painting horizontally.
- Pour a small amount into one corner of the painting
- Using a foam brush move from this corner, without almost any pressure, to cover all the painting with the finish
- Check if the whole painting is evenly covered.
- Clean the brush in warm water, let it dry, and wait at least 2 hrs to apply the second coat. You need 2-4 coats.
As for me, it seems much easier and nice to deal with than varnish and you don’t have to worry about yellowing or replacing it over years.
New Era – Epoxy
Today, more and more painters choose epoxy for acrylic painting and pouring and I’m not surprised! While it is a more expensive and challenging way to protect a painting, it is well worth it.
Epoxy is self-leveling, extremely durable, water-resistant, glossy, smooth, and can easily fill in even small cracks. No varnish can compete with epoxy. It is like a smooth soft glass on your painting. Once you apply it, it will take overnight to spread evenly across the canvas and create a perfect finish.
How to epoxy your painting or pour:
- Let painting completely dry. I give it a whole week before I apply epoxy.
- Please always wear gloves, it is no fun removing epoxy from the skin. You may also want to wear a gas mask or respirator as epoxy fumes can be toxic and epoxy is flammable. Choose a well-ventilated area.
- Buy epoxy and following the ratio of the manufacturer, mix it and stir very well, at least for 5 min. Epoxy is a 2-component finish, some brands require to mix 1:1, some 1:1,5, and some 1:2 – you will find this info on the label. To mix I prefer silicone cups as if I use plastic – epoxy will stick to it almost permanently. Some brands say that a general rule is that 4 oz (118 ml) of the epoxy mix can cover up to 1 sq f (0.09 sq m).
- Remove visible bubbles (they will ruin the smoothness of the finish) with a heat gun or torch. Don’t use a hair dryer.
- Pour some epoxy into the middle of the canvas and start spreading it with your hand (in a glove!!). Don’t miss the edges. Once you spread it, leave it. Don’t try to make it super even, as the epoxy can level itself, it will do the thing.
- Make sure there are no bubbles. Again, if there are some – torch them.
- Leave it to dry. Make sure the surface the painting with epoxy is on is leveled, as if it has a tilt, epoxy will shift. Make sure there are no bugs, pets, or kids in the room where the epoxy will be drying, as if something lands on it while it is still sticky, and you won’t notice it, it will be stuck forever 🙂 If you will see something while the epoxy is still wet, use tweezers to remove the debris.
Step 4 – Glass or Plastic
Glass – is a very solid, hard, and transparent material to protect the painting.
Glass protects painting in many ways:
- from touching
- from dust collecting (we remember that acrylics are very likely to collect dust and dirt)
But glass doesn’t protect acrylic paint from UV radiation and eventual fading. Also, check your glass before using it because glass tends to have a greenish tint or be a little bit milky which will alter the clarity of the painting and make it less enjoyable.
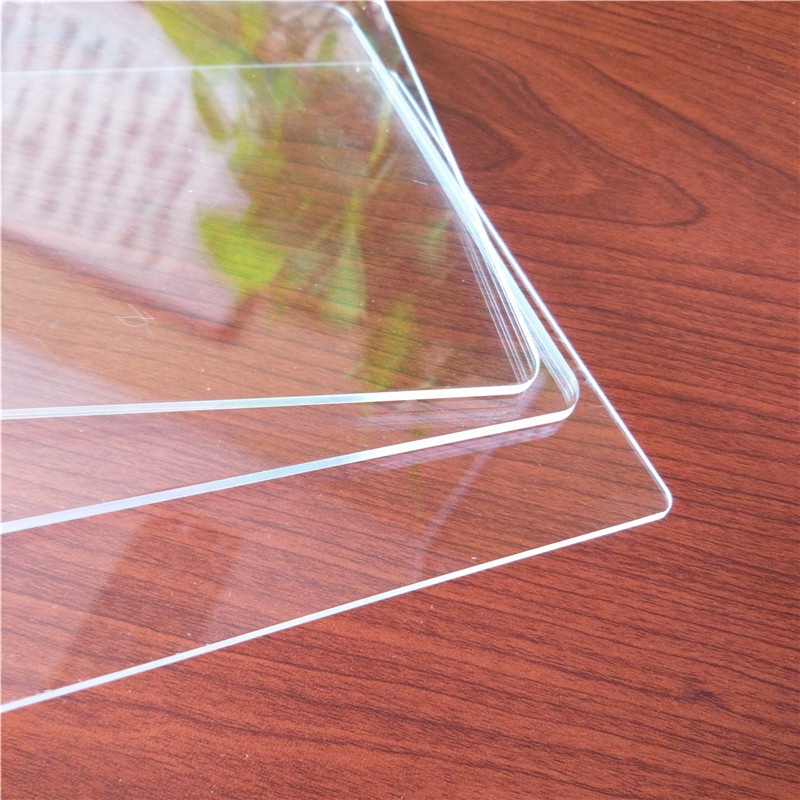
UV-protected plastic sheets have reflective properties, and protect from dust and touching, but also is half weight of glass and much less fragile!
It also allows more light through the surface. Acrylic UV sheets can transmit up to 92% of visible light while mineral glass transmits only 80-90%, depending on the manufacturer.
Sheets can be thin or thick, check before buying.
I would choose UV-protected sheets, as for me it’s a modern and easy solution.
If you are looking for some, try Amazon search “Protective Picture Framing Acrylic Sheet“, it will look like this and have different sizes available:
Framing acrylic painting will protect not only the surface but all sides from dust and environmental changes like temperature, humidity, or airflow.
Today, the most popular choice for framing a painting is the box frame (or ‘tray’ frame, ‘shadowbox’ frame, or ‘floating’ frame).
Step 5 – Properly maintain and store paintings to protect them
It is crucial how you will “treat” your painting after it’s done and even after it is varnished. Wrong maintenance will damage even varnished painting over time.
Please, follow these simple guidelines to protect and maintain acrylic paintings on canvas:
1 – Cleaning
Gently dust your acrylic painting with a feather duster. Move from side to side evenly to be sure you clean the entire surface. The feather duster is gentle enough and it won’t damage your acrylic painting.
Alternatives to a feather duster: large sable brush, or contact and pay professional art cleaner
Never use water or cleaning solution to clean acrylic paintings!
2 – No touching
Avoid touching acrylic paintings with your fingers and don’t let other people and children do it.
Our skin constantly produces oils and they can damage your acrylic pain over time, and even result in discoloring.
3 – Proper environment
The best environment for painting storage:
Temperature: 65-75 degrees Fahrenheit (18 – 24 C).
Humidity: 50%
Well-aired room
What to avoid in order to protect acrylic painting:
- bright sunlight – sun damages paint and make it fade over time.
- dry or high humidity room – everything below 40% and above 56% can destroy your painting. Humidity causes warping and cracking. (Check here How to fix cracks)
- heat or freezing – it causes cracking or peeling off.
- air blowing directly on the paintings
Tips for the right environment:
- place or hang acrylic paintings on the wall with less sunlight
- use a hygrometer to check the level of humidity in your house or atelier. I found one for $5 on Amazon, but sometimes thermometers also have this option.
- use a dehumidifier if your place is more than 50% humidity or a humidifier for a super dry space. Don’t place it next to the painting.
- store paintings in a cool, dark room.
- if you’re storing all your acrylic paintings together, put a clean board or something non-absorbent between paintings.
- if you can’t fix something and it is very precious work, don’t experiment, contact a professional.
4 – Remove and replace varnish if needed
If you use removable varnish, you will notice over time that it yellows and collects dust. Art cleaners recommend replacing varnish every 50 years, but if you feel like your painting needs it now, just do it. Here is the step-by-step process.
Removing and replacing helps your painting last longer.
Why do we need to protect acrylic paintings?
I think this is quite obvious that if we like the art we should keep it and make it last longer. Masterpieces in museums and private collections are highly valuable and maintained, but every our work is precious too. And we can protect it almost for free from damage and leave it for our grandchildren or sell it without worrying about its quality over years.
Acrylic paint is very popular among beginners and professional artists: it dries quickly and has lots of nice properties and techniques, so everyone can find an original style. I do all my paintings with acrylics, even if I was taught how to paint with oil.
But nothing is perfect in the Universe and acrylics have some downsides.
1 – To protect the painting from dust
The major is that even being dried, it is “soft”, very easily collect dust and all kind of dirt. This is why we need varnish or other protective finishes – they seal the surface and make it easy to clean because you can not just clean unprotected acrylic paint.
Protective finishes will create an even and smooth surface which is beneficial for visual aspects, cleaning, and protection. It will eliminate all unwanted little bumps or textures.
2 – To make cleaning easy
Even a protected painting can be wiped and cleaned with a duster. The acrylics can’t be cleaned with water or exposed to it, but the protective coat is water-resistant.
3 – To make paintings and color saturation last longer (hundreds of years)
This is not only about painting’s lifetime but also about keeping colors as bright as they were once you finished your work. A protective finish will increase color saturation, and a glossy finish will add an extra sheen.
4 – To protect painting from extreme temperatures, UV radiation, humidity, and airflows.
Shifts in temperature and humidity will significantly damage your painting and lead to warping, cracking, peeling, and discoloring.
UV radiation causes fading and colors will lose their vivacity over time.
11 best products to protect your acrylic paintings
| Brand | Type | Note | Price |
| Golden Acrylic Gesso | Gesso | Artist-grade great gesso 8 oz – 128 oz | $9.71 – $61.55 |
| Liquitex Acrylic Gesso | Gesso | Artist-grade gesso 4 colors available 4 oz – 128 oz | $10.99 – $69.99 |
| Golden Isolation Coat | Isolation coat | Softer than regular gel, won’t hold a sharp texture but still shows brush strokes. Thinner than a regular polymer medium. Glossy | $14.41- $31.39 |
| Golden Gloss UV Topcoat | Isolation coat | Good for textured paintings. A regular gel with added UV | $25.91 -$34 |
| Golden Polymer Varnish | Varnish | Removable water-based varnish with Ultra Violet Light Stabilizers Not recommended for use on furniture Thin with 25% distilled water before use Remove with ammonia 4 oz – 128 oz | $6.83 – $84.41 |
| Golden MSA varnish | Varnish | Mineral Spirit Acrylic Varnish with UltraViolet Light Stabilizers Removable Thicker viscosity than traditional varnishes Remove with spirits 4 oz – 128 oz | $14.69 – $111.65 |
| Liquitex Varnish | Varnish | UV protection, durable NOT removable Matte, Satin, Gloss, High Gloss * I got some testimonials about cracks and uneven coverage using Liquitex. | $6.92 – $90.88 |
| Grumbacher spray varnish | Varnish | Crystal-clear when applied Dries quickly Has gloss finish Non-yellowing Removable with paint thinner or a mild solvent 11 oz | $11.42 |
| Minwax Protective – BEST for beginners! | Protective Finish | Fast-drying Gloss, satin, matte Non-yellowing Water-based 1 quart | from $17.97 |
| Water-Based Helmsman Spar Urethane | Protective Finish | Gloss, semi-gloss, satin Won’t amber over time UV protection, moisture protection 1 quart | from $18.5 |
| Winsor & Newton Spray Varnish | Spray Varnish | Super easy to use for beginners, Light, glossy coating I’m using it even for paper | around $9 |

Masha Eretnova, born in 1991, is a Chiang Mai-based certified teacher, artist, and blogger with 20+ years of personal painting journey.
She started painting and drawing very early and is now an international abstract artist and educator passionate about acrylic painting, gouache, and crafts.
Her works are part of international exhibitions and contests, including ArtlyMix (Brazil), Al-Tiba 9 (Spain), Exhibizone (Canada), Italy, and many more.
Besides her artistic pursuits, Masha holds a post-grad diploma in Teaching Film Photography and 2 music school diplomas: piano and opera singing.
Last update on 2026-07-21 / Affiliate links / Images from Amazon Product Advertising API